
Build your first Elementor page with an AI agent
Start with a small draft, then inspect what WordPress saved. This walkthrough takes you from a connected AI client to an editable Elementor page using EMCP Tools. Give the agent a concrete brief, check the element tree, review desktop and mobile layouts, and revise the same page before publishing.
The example is Northline Studio, a fictional design studio. Its three sections use containers, headings, text and a button. No contact form, paid template or Elementor Pro widget is needed. Your agent’s wording and layout may differ; use the checks below to judge the result.
- 01 / InspectKnow the siteRead pages, widgets and styles.
- 02 / BuildCreate one draftUse a concrete three-section brief.
- 03 / ReviewCheck what savedInspect widgets and both layouts.
- 04 / RefineEdit the same pageFix one issue, then preview again.
1. Connect your client and confirm the site
Section titled “1. Connect your client and confirm the site”You need WordPress with EMCP Tools and Elementor active, plus an AI client connected to that site. Elementor is required for this exercise even though EMCP’s general WordPress tools also work without it. It must also be the selected standalone builder on EMCP Tools → Page Builders; EMCP selects it automatically when Elementor is active and no other builder has been chosen. Check the current version requirements.
Choose the setup guide for Claude Code, Claude Desktop, or Cursor. Finish that connection first, then return here. EMCP Tools → Connection walks you through four steps and, in the last one, waits for your client’s first call and confirms it. Use a staging site for your first build.
Paste this read-only prompt:
Before making changes, identify the WordPress site you are connected to.List the pages I can access, showing title, ID and status.Check whether Elementor is active and list the available heading,text-editor and button widgets. Do not create or edit anything yet.Check the result: it should contain records from your site, not an invented page list. Confirm the site identity before enabling the writes needed for the example. The connected WordPress user must have the required permissions; see WordPress MCP security.
If you see three dispatcher tools, you may be using Compact mode. Ask the agent to discover the underlying tools and read their schemas. Zero tools, an authorization error and an incomplete catalog are different problems; use No tools appearing to diagnose the connection.
2. Inspect an existing page before designing
Section titled “2. Inspect an existing page before designing”Choose a page whose spacing and typography you want to follow. Replace REFERENCE_PAGE_ID with its actual ID:
Read the structure and a page snapshot for REFERENCE_PAGE_ID.Summarize its container layout, heading hierarchy, colors, typographyand responsive settings. Inspect the heading, text-editor and buttonschemas before proposing settings.
Use existing global style references where they fit. Do not changesite-wide colors, typography, the header, footer or other pages.If no suitable reference exists, propose page-local styles instead.
The page snapshot can report the saved tree, style references and responsive overrides. It does not prove that a layout looks right in a browser. Global styles are shared: changing the active kit can affect other pages. For this first exercise, reading or reusing an existing reference is enough.
3. Give the agent a complete page brief
Section titled “3. Give the agent a complete page brief”Copy this brief. It defines the content, editable structure and review boundary together:
Build one Elementor draft titled:Northline Studio | EMCP first-page example
Northline is a fictional independent design studio. Create these sections:
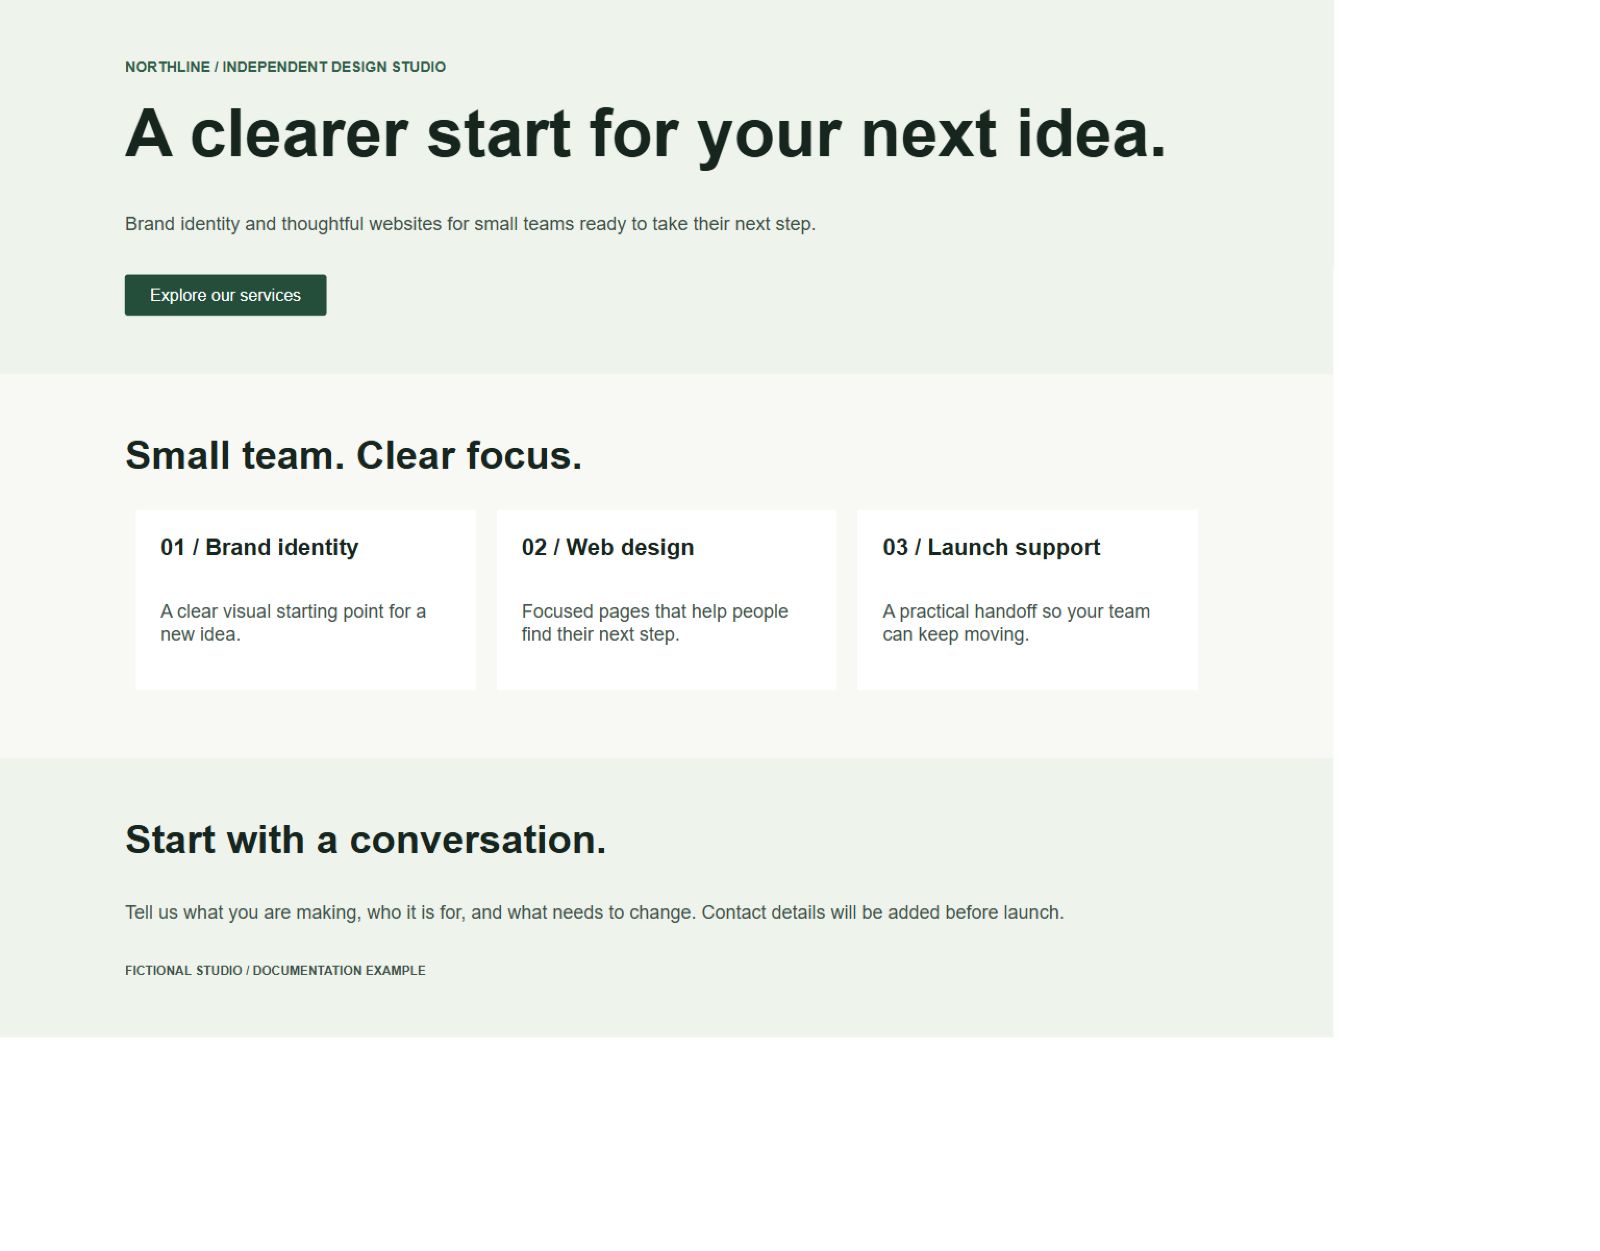
1. Hero   Eyebrow: NORTHLINE / INDEPENDENT DESIGN STUDIO   H1: A clearer start for your next idea.   Text: Brand identity and thoughtful websites for small teams ready   to take their next step.   Button: Explore our services. Link it to #services.
2. Services (section anchor: services)   H2: Small team. Clear focus.   Three cards with H3 headings:   Brand identity: A clear visual starting point for a new idea.   Web design: Focused pages that help people find their next step.   Launch support: A practical handoff so your team can keep moving.
3. Contact introduction   H2: Start with a conversation.   Explain what a visitor should include in an enquiry. Say contact   details will be added before launch. Label this a fictional example.   Do not invent an address, email, testimonials, clients or results.
Use native Elementor containers, headings, text-editor and buttonwidgets. Use one H1. Keep the layout text-led, with generous spacing.Use reference styles if suitable, or page-local dark green texton pale backgrounds. Do not modify the global kit.
Show the planned sections and tool inputs first. Explicitly set statusto draft. If build-page is available, validate with dry_run, reviewits warnings, then create the page once. Do not create an empty pagefirst. Stack the cards on tablet and mobile. Keep text readable andbuttons usable without horizontal page scrolling.
Return the actual saved page ID, status, edit link, element count andany warnings. Stop after creating and inspecting the draft. Do not publish.
Why the tool choice matters: build-page creates a new WordPress page from title and structure. It does not populate a previously created page by post_id. An incremental alternative is create-page followed by container and widget tools. Use one route, not both.
Review the proposed plan before the write. A dry run checks the structure and reports warnings; it is not a screenshot or a guarantee that every widget will render. If a write times out, inspect the page list for the draft before retrying. Repeating build-page can create another page.
4. Read back the saved draft
Section titled “4. Read back the saved draft”Replace NEW_PAGE_ID with the returned ID and keep using that same ID for every revision:
Read NEW_PAGE_ID back from WordPress. Confirm its title and draft status.Get its saved Elementor structure and a page snapshot.Check that the hero, three service cards and contact introduction exist.Report the H1 count, button destination, responsive overrides and anymissing or skipped widgets. Do not describe a successful build fromthe write response alone, and do not make another page.| Check | What you want to find |
|---|---|
| Identity | The returned ID belongs to the new Northline draft |
| Content | All three sections and all three services are present |
| Structure | Native containers and individual editable widgets |
| Headings | One H1, section H2s and service H3s |
| Button | #services matches the services container’s anchor |
| Styles | Existing references or page-local settings, with no kit changes |
| Responsive settings | Explicit stacking and suitable spacing on smaller screens |
Open the draft in Elementor and expand the Structure / Navigator panel. Select a heading and a button. Their text and settings should be editable from their own widget panels. If the agent put the entire page into one HTML widget, ask it to rebuild that content as native widgets before proceeding.
For comparison, this is the saved structure of our example, summarized from WordPress readback. It contains 7 containers and 14 widgets, with no HTML widget:
Hero container Heading (eyebrow) / Heading (H1) / Text / ButtonServices container Heading (H2) Services row Brand identity card: Heading (H3) / Text Web design card: Heading (H3) / Text Launch support card: Heading (H3) / TextContact container Heading (H2) / Text / Heading (example label)5. Review desktop and mobile
Section titled “5. Review desktop and mobile”Open the draft preview from the WordPress admin while signed in. A draft’s normal URL may not be visible to a logged-out visitor. Use Elementor’s responsive preview and resize the actual browser as well.
Check the whole page, not just the hero:
- At desktop width, read every section and check the spacing between cards.
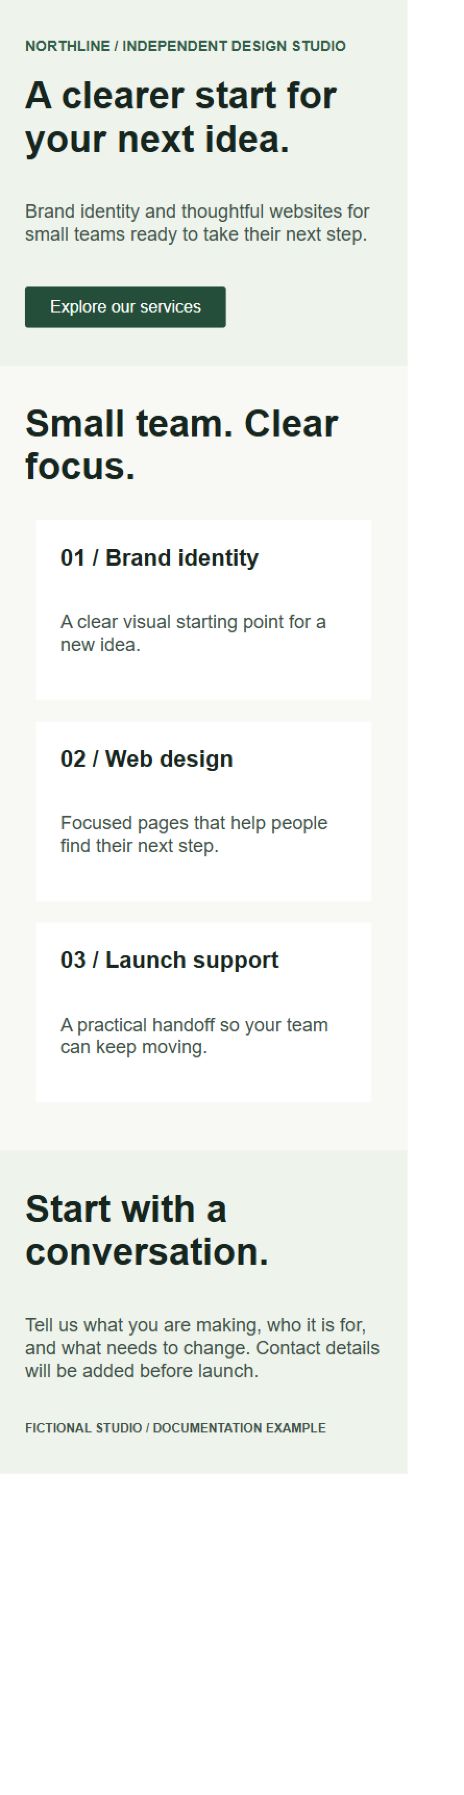
- At tablet and phone widths, confirm the services stack and no content is clipped.
- Click Explore our services and confirm it reaches the services section.
- Use the keyboard to reach the button and check that focus is visible.
- Check heading order, text contrast and image alternative text if you added images.
- Look for invented claims, placeholder destinations and missing contact details.
The example below was saved as an Elementor draft. These are captures of its rendered content at two widths, with theme chrome omitted for comparison.
6. Make one targeted revision
Section titled “6. Make one targeted revision”Describe the visible problem, identify the existing page and keep the change bounded. Our example exposed a real issue: the button linked to #services, but the services container had no matching HTML ID. The initial input used css_id; the native container control was _element_id.
On NEW_PAGE_ID, Explore our services changes the URL to #services,but there is no matching section target. Inspect the services containerand its native CSS ID setting. Set its anchor to services using thecorrect setting from the schema. Preserve the layout, copy and draftstatus. Read the saved setting back and test the button in the preview.Do not run build-page or create a second page.For an existing page, update-element and the layout tools let the agent target saved element IDs. In this example, setting _element_id to services on the existing services container fixed the target without creating another page. After a revision, repeat the browser check that exposed the problem. A saved setting and a correct visual result are two separate checks.
If a revision goes wrong, open EMCP Tools → History: each recorded change has an Undo button, and Undo whole session rolls back everything from one session, newest first. See Change History and rollback. The five newest changes also appear under Recent changes on the Dashboard, each with Undo.
7. Decide when to publish
Section titled “7. Decide when to publish”Keep this example as a draft until you replace the fictional content and supply a real contact destination. Before publishing a real page, review its title, slug, copy, links, responsive layout and SEO settings. Confirm any forms work with a test submission if you add them later.
Publish deliberately from WordPress, or give the agent a separate instruction naming the exact page ID after your review. Creating an Elementor draft does not make it indexed by search engines.
Example verification
Section titled “Example verification”The example was created locally on 22 September 2026 using WordPress 7.1.1, PHP 8.4.15, Elementor 4.2.4 and an unreleased EMCP 3.18.0 development build. The test called EMCP’s build-page controller through WP-CLI with its creation permission check, saved a draft and read all 21 stored elements back. The dry run reported no warnings and the active kit settings were unchanged. It was not a recorded Claude or Cursor session. The title / structure contract was also checked against the v3.17.0 source.
The captures show Elementor’s rendered content in an isolated preview, not the WordPress editor. This example uses no Pro widgets; Elementor Pro was active in the test installation. Recheck the tool schema on your installed version rather than assuming the development version is a released requirement.
Continue building
Section titled “Continue building”- Writing your own prompts: turn your real project brief into actionable instructions.
- Agent skills: give your agent the Elementor workflow conventions.
- Build-page reference: inspect the input and result fields.
- WordPress MCP security: review identity, tool access and publishing boundaries.
From a draft to an agency handoff
Section titled “From a draft to an agency handoff”Use the AI Elementor agency workflow to turn a brief into acceptance checks, review desktop and mobile output, record a targeted revision, and prepare a handoff with unresolved work clearly identified.