
Disabling individual tools
The Tools screen in EMCP Tools lets you toggle any individual MCP tool on or off. The choices apply globally. Every MCP client that connects sees the filtered list.
How to use it
Section titled “How to use it”For authentication choices and a first-task workflow, see the WordPress MCP security guide. Tool toggles and the connected user’s permissions serve different purposes.
- WordPress admin → EMCP Tools → Tools (in the Setup group of the EMCP sidebar)
- Pick the platform tab, then find the tool. The search box (“Search tools…”), the risk filter (All / Read-only / Writes / Destructive) and the “Status” select (Any / Enabled / Disabled / Unavailable) narrow the list.
- Switch the tool’s toggle off (gray, no fill)
- A save bar appears at the bottom with the number of unsaved changes: click Save changes, or Discard to throw the edits away. Leaving the page with unsaved changes asks you to confirm first.
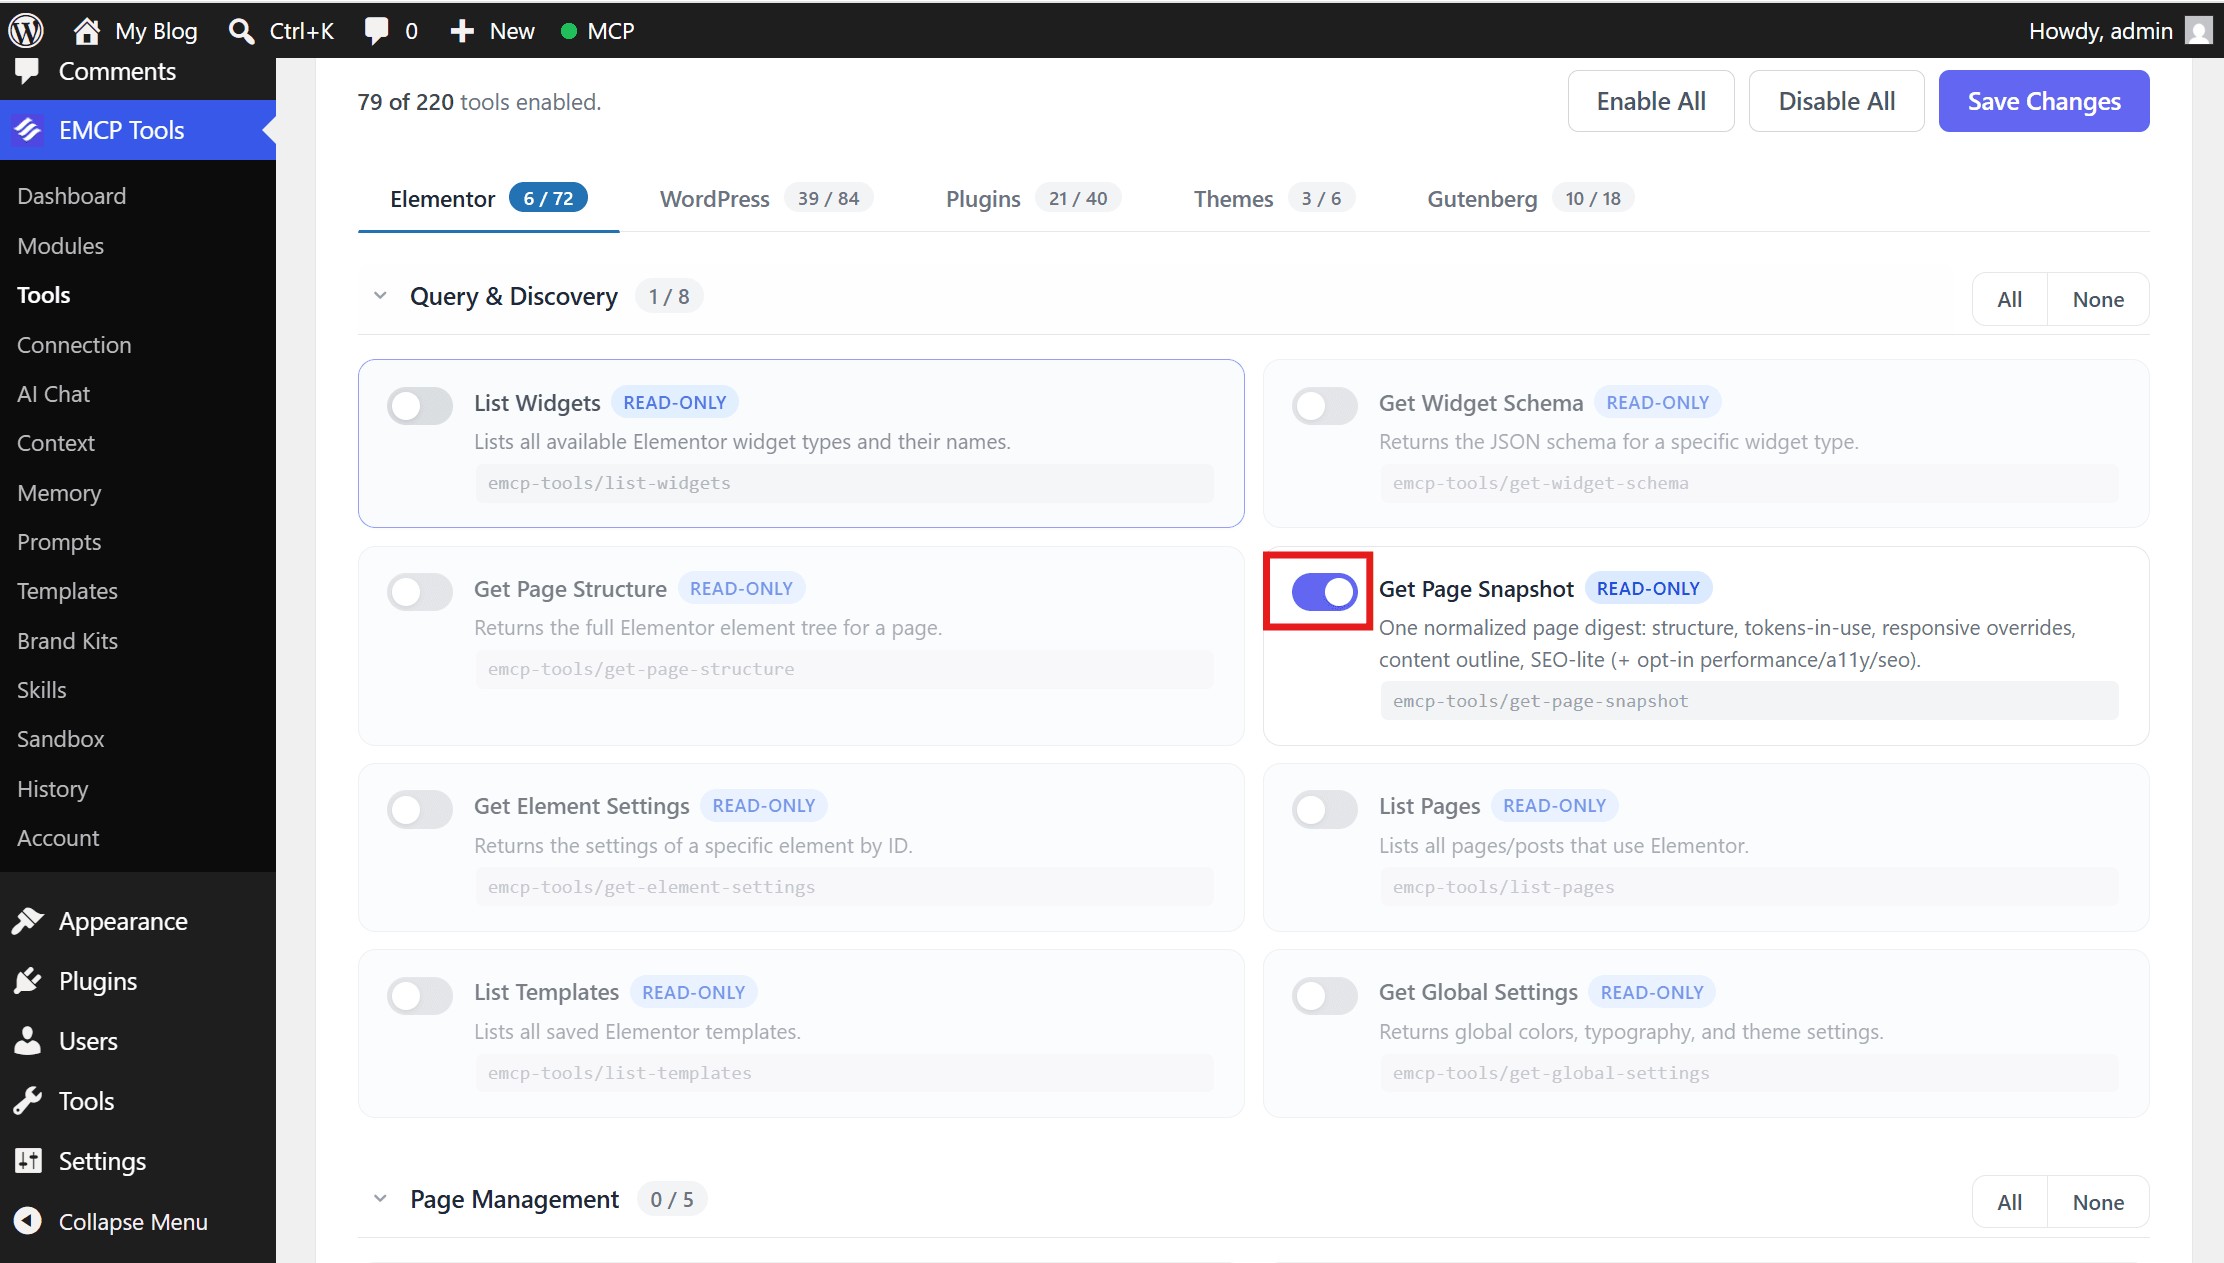
The server applies the change on the next MCP request from any client (Claude, Cursor, Antigravity, etc.). Most clients only read the tool list when they connect, so the “Tools saved” toast reminds you to reconnect your client to see the change.
Why a toggle might be greyed out
Section titled “Why a toggle might be greyed out”New in v3.14.0. A tool that depends on another plugin or theme (WooCommerce, an Elementor Addons pack, a specific form/SEO plugin, Astra/Kadence/GeneratePress/Blocksy, …) shows a greyed-out toggle whenever that dependency isn’t installed and active, same as a tool you’ve switched off yourself. Before 3.14.0 both cases looked identical, which reads as “broken” or “not included in my plan” rather than what it actually is.
Every such card now carries a badge naming what’s missing, “Needs Essential Addons for Elementor,” for example, with a line underneath saying whether it’s a plugin that isn’t active or a theme that isn’t the current one. It covers every dependency-gated tool on the Tools screen, not just one integration. If you see this badge, the fix is installing/activating the named plugin or switching to the named theme, not a licensing issue and not a bug.
The platform tabs
Section titled “The platform tabs”Tools are grouped into platform tabs, each showing its enabled/total count. In order:
- the standalone page builder you selected on EMCP Tools → Page Builders (for example Elementor, or BeBuilder, which carries the BeTheme and BeBuilder tools; no tab when you chose “Gutenberg only”),
- one tab for each Gutenberg block plugin you switched on there (Spectra, Kadence Blocks, GenerateBlocks, Blocksy Blocks, Otter Blocks),
- WordPress (tools that drive WordPress itself: content, settings, media, users, database, filesystem…),
- Plugins, Themes, Gutenberg,
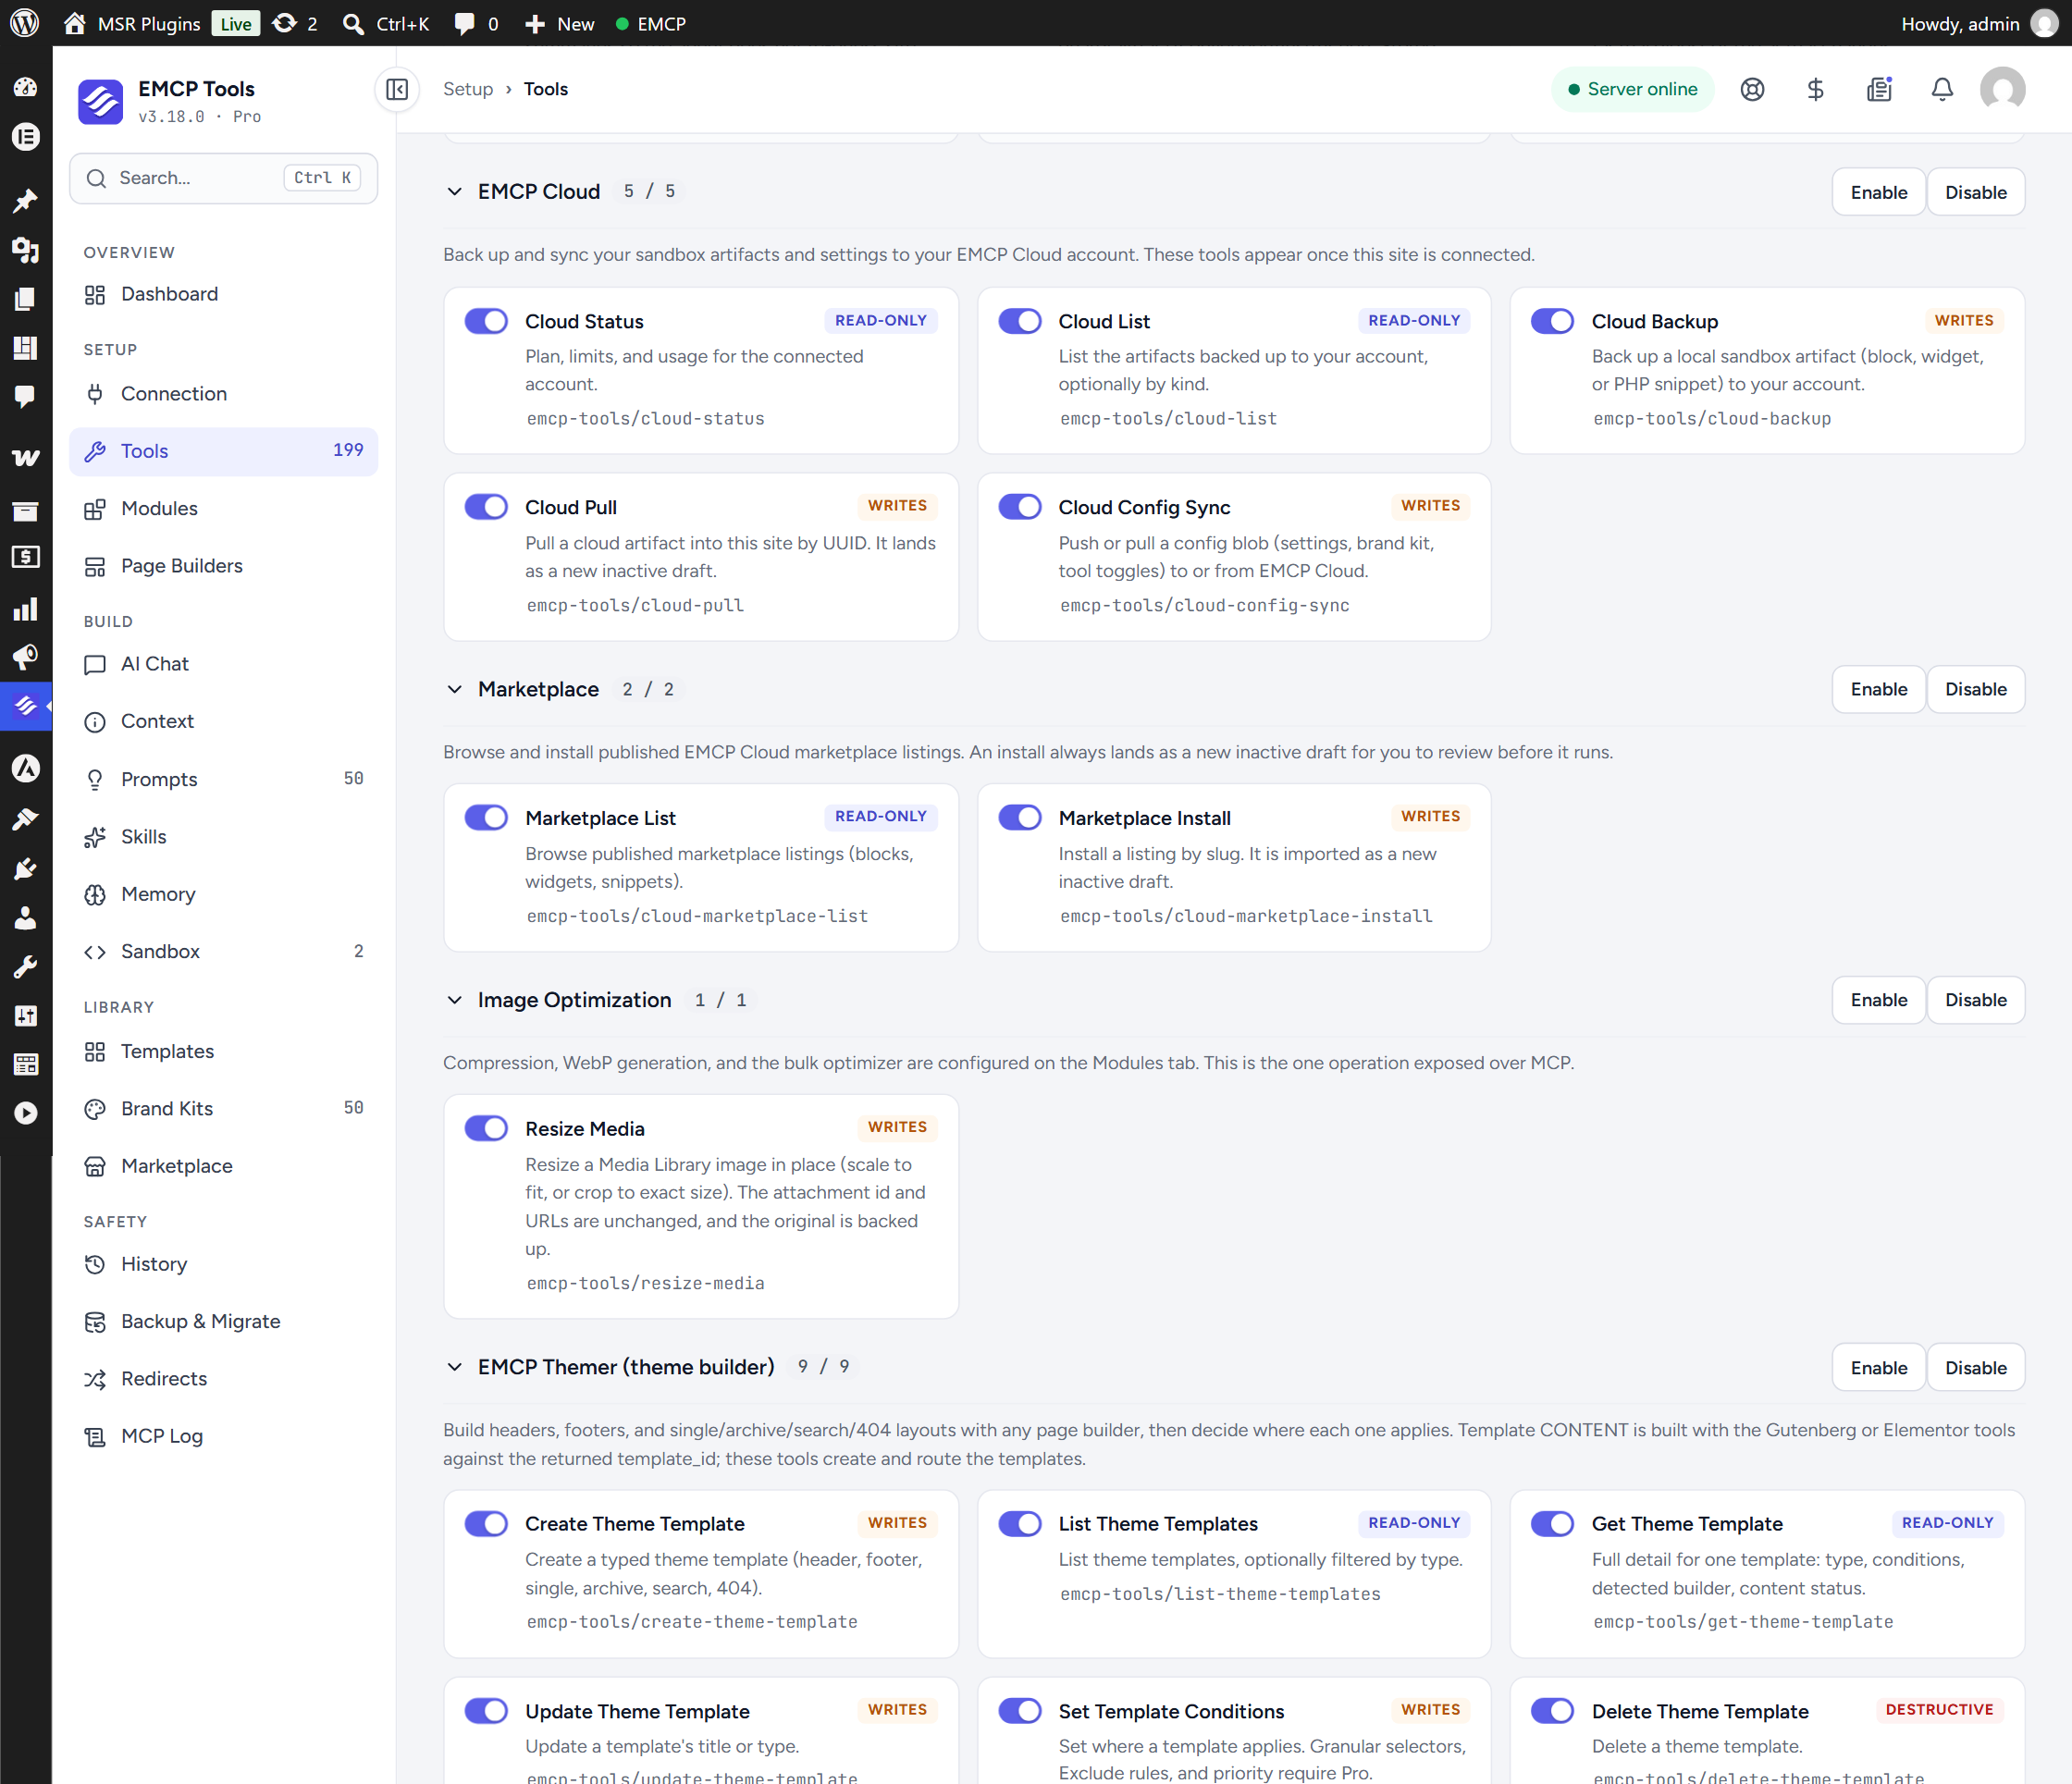
- and EMCP Modules, EMCP’s own subsystems: Redirects, Backup & Migrate, Changes & Rollback, Content Search, Content Mirror (Git), PHP Snippets (Sandbox), Sandbox Cloud, Project Memory, EMCP Cloud, Marketplace, Image Optimization, the EMCP Themer theme builder and Themer PHP Templates.
Within a tab, tools sit in category sections. Each section header shows its “N / M” count and its own Enable and Disable buttons. Each tool card shows a READ-ONLY, WRITES or DESTRUCTIVE badge and its ability name (emcp-tools/...); dispatcher tools also show how many operations they carry.
New in v3.13.0: the EMCP Modules tab. Before this, those subsystems were scattered across the WordPress tab alongside actual WordPress-management tools, about half the tab wasn’t WordPress management at all. Splitting them out didn’t change what any tool does or whether it’s enabled, only where you find its toggle.
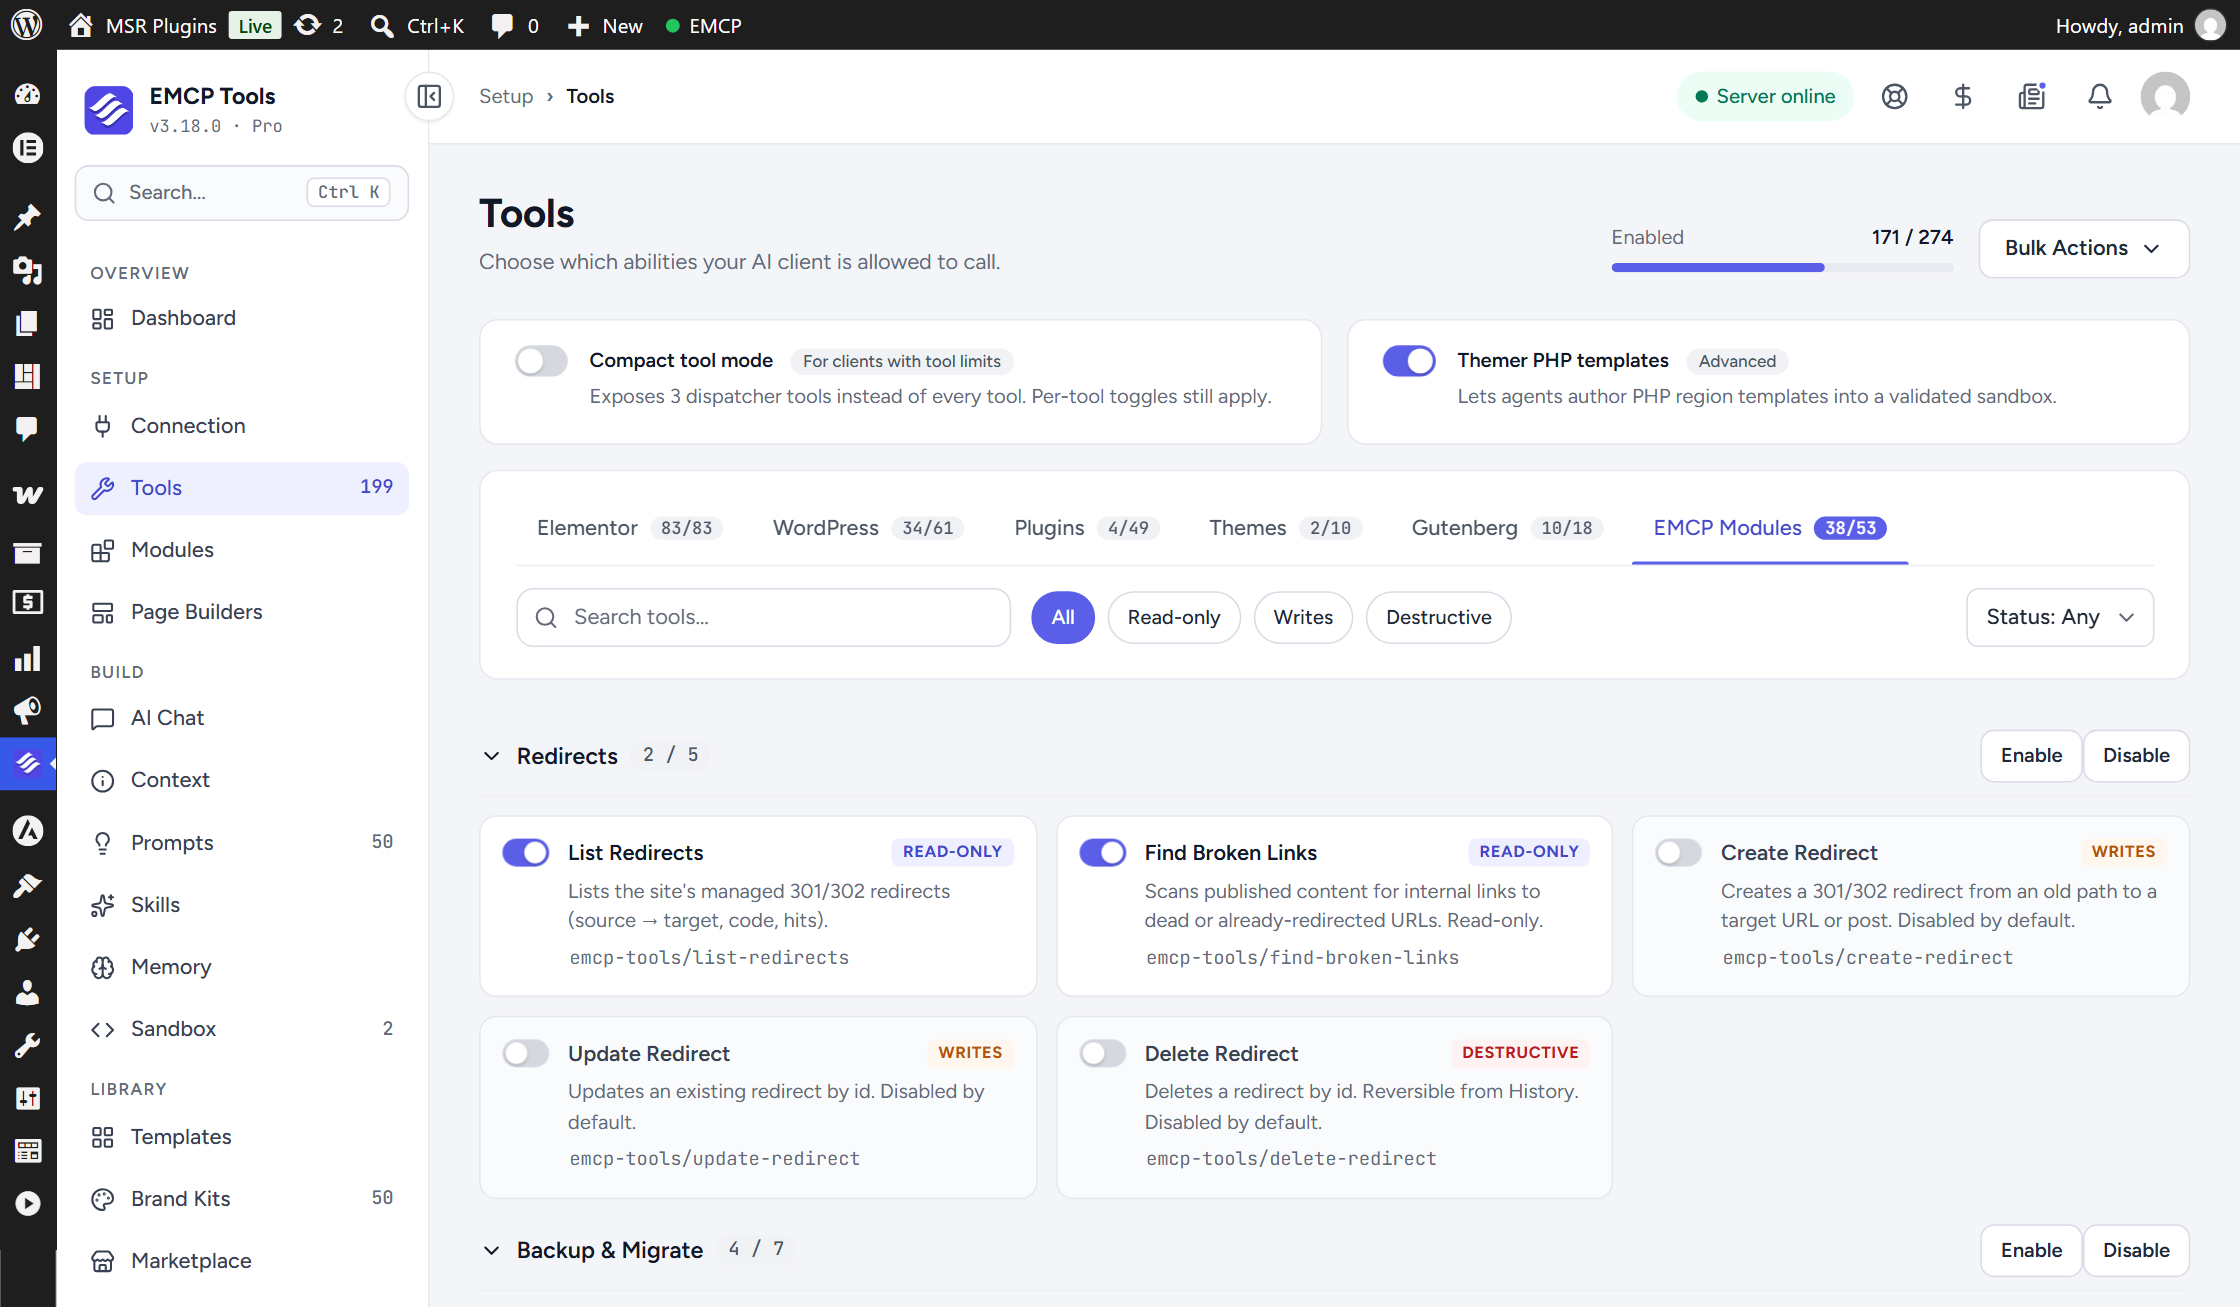
In the same release, the Cloud, Marketplace, and Resize Media (Image Optimization) tools became visible and toggleable here for the first time; they’d always registered and worked, they just had no entry on this screen before, so you couldn’t switch one off on its own and they were missing from every tool count.
What’s stored
Section titled “What’s stored”A single WordPress option, emcp_tools_disabled_tools, holding an array of disabled tool slugs (e.g. ["emcp-tools/add-form", "emcp-tools/add-popup"]). Empty array = nothing disabled.
As of 3.18.0, a save sends only the difference: the tools you switched on and the tools you switched off since the screen loaded. Tools you did not touch keep their stored state, including tools that belong to a builder or plugin that isn’t active right now, so switching page builders or deactivating a plugin never resets your choices. Only tools that are visible and available can be switched on.
Why this matters
Section titled “Why this matters”Before v1.6.0, the disabled-tools filter was registered inside the admin class, which only loads on is_admin() requests. MCP clients connect via the REST endpoint, not admin context, so the filter never fired and disabled tools were still exposed.
That bug is fixed in v1.6.0+. The filter now lives in EMCP_Tools_Plugin (always loaded) and runs on every request: admin pages, REST endpoint, WP-CLI bridge, everywhere.
Pro and write tools are disabled by default
Section titled “Pro and write tools are disabled by default”On a fresh install, every Pro-badged tool starts disabled, read tools included, and so do the powerful opt-in groups: SEO & Accessibility, Widget Builder, PHP Snippets, the Plugins & Themes write tools, delete-media, the Users, Filesystem and Database write tools, and the Themer PHP template tools. Free plugin and theme integrations start with their read tools on and their write tools off. This keeps the active tool surface lean out of the box; enable any of them from the Tools screen.
The defaults are versioned. A marker option (emcp_tools_defaults_applied, version 53 in 3.18.0) records which defaults a site has already received. A fresh install gets the whole set once. On an upgrade, only the defaults added since the stored version are applied: a release that ships a new write tool adds just that tool to the disabled list, so the tools you already switched on or off keep your saved choices.
Bulk Actions → Reset to defaults returns every toggle to the fresh-install state described above (after you confirm and click Save changes). The setting persists per site; to enable Pro tools on every site, switch them on after install on each one, or push your tool toggles between connected sites with EMCP Cloud’s Settings sync.
Bulk actions
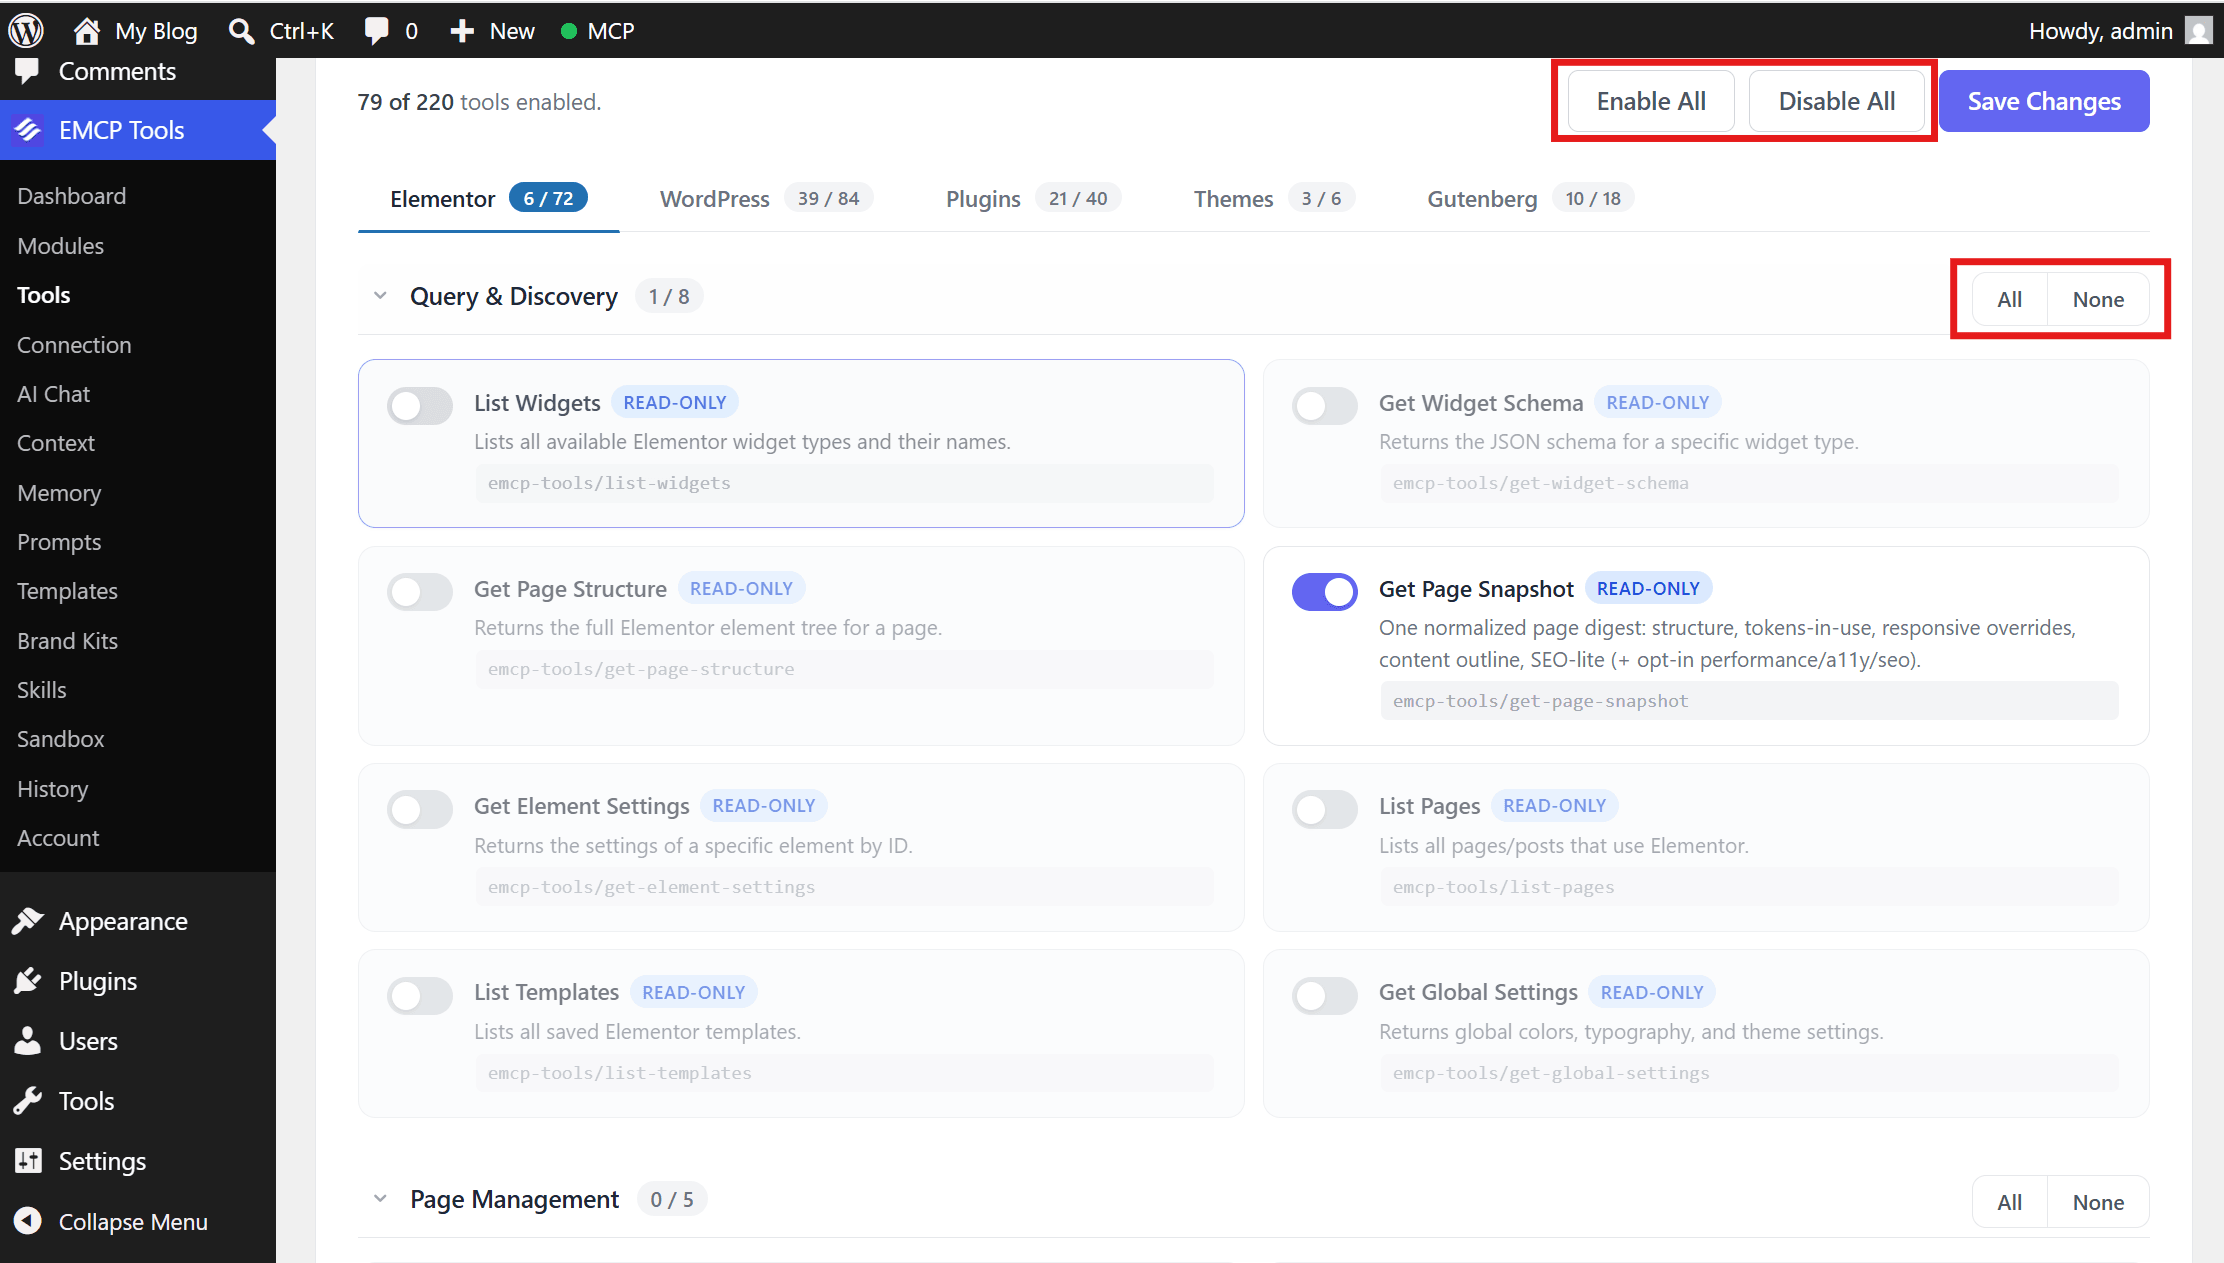
Section titled “Bulk actions”The Bulk Actions menu, next to the “Enabled N / M” counter at the top of the Tools screen, has three entries:
- Enable all visible: switches on every tool the current tab and filters show
- Disable all visible: switches off every tool the current tab and filters show
- Reset to defaults: puts every toggle back to the fresh-install defaults described above. It asks you to confirm first.
None of them saves anything: they change the form, and the save bar’s Save changes writes the result (or Discard undoes it).
Per-category bulk actions live in each category header: Enable and Disable affect only that section’s tools.
Interaction with Compact tool mode
Section titled “Interaction with Compact tool mode”Compact tool mode doesn’t change which tools are enabled. It only changes how they’re exposed. Instead of registering one MCP tool per ability, the server surfaces 3 dispatcher meta-tools (list-tools, get-tool-schema, call-tool) and the agent reaches every tool through call-tool.
Your per-tool toggles still govern what’s allowed:
runnable_via_call-tool = NOT in emcp_tools_disabled_tools AND caller passes the tool's own capability checkPractical effect: a tool you disable here is refused by call-tool too, and list-tools won’t advertise it. Compact tool mode is a delivery mechanism; your disabled list is still the source of truth for what an agent can run.