
Connect Claude Desktop to WordPress with MCP
Use Claude Desktop with EMCP to inspect WordPress pages and work with supported builder and plugin tools. Choose a connection bundle for desktop setup, a supported OAuth connector for an HTTPS site, or a local bridge.
Before you connect
Section titled “Before you connect”- Install EMCP and confirm the WordPress and PHP requirements.
- For remote connections, use your site’s complete server URL from EMCP Tools → Connection. OAuth requires HTTPS and an administrator to approve access.
- Keep sensitive writes disabled while verifying the connection. Tool availability depends on your tier, installed integrations and WordPress permissions.
One-click bundle (recommended)
Section titled “One-click bundle (recommended)”The fastest path, no config files to edit. In WordPress, open EMCP Tools → Connection and follow the four steps:
- Choose your AI client: pick Claude Desktop.
- Pick how it signs in: pick Application password (the bundle carries a password, so it is not offered for OAuth).
- Add EMCP to Claude Desktop: choose the administrator and click Create password (it is shown once), or open Use a password I already have, pick it and type it in. Under One-click bundle (.mcpb), click Download .mcpb bundle, then double-click the downloaded
.mcpbfile to install the server in Claude Desktop. Click I’ve added it, continue. - Test the connection: the screen waits for Claude Desktop’s first MCP call and shows “Claude Desktop is connected” when it arrives.
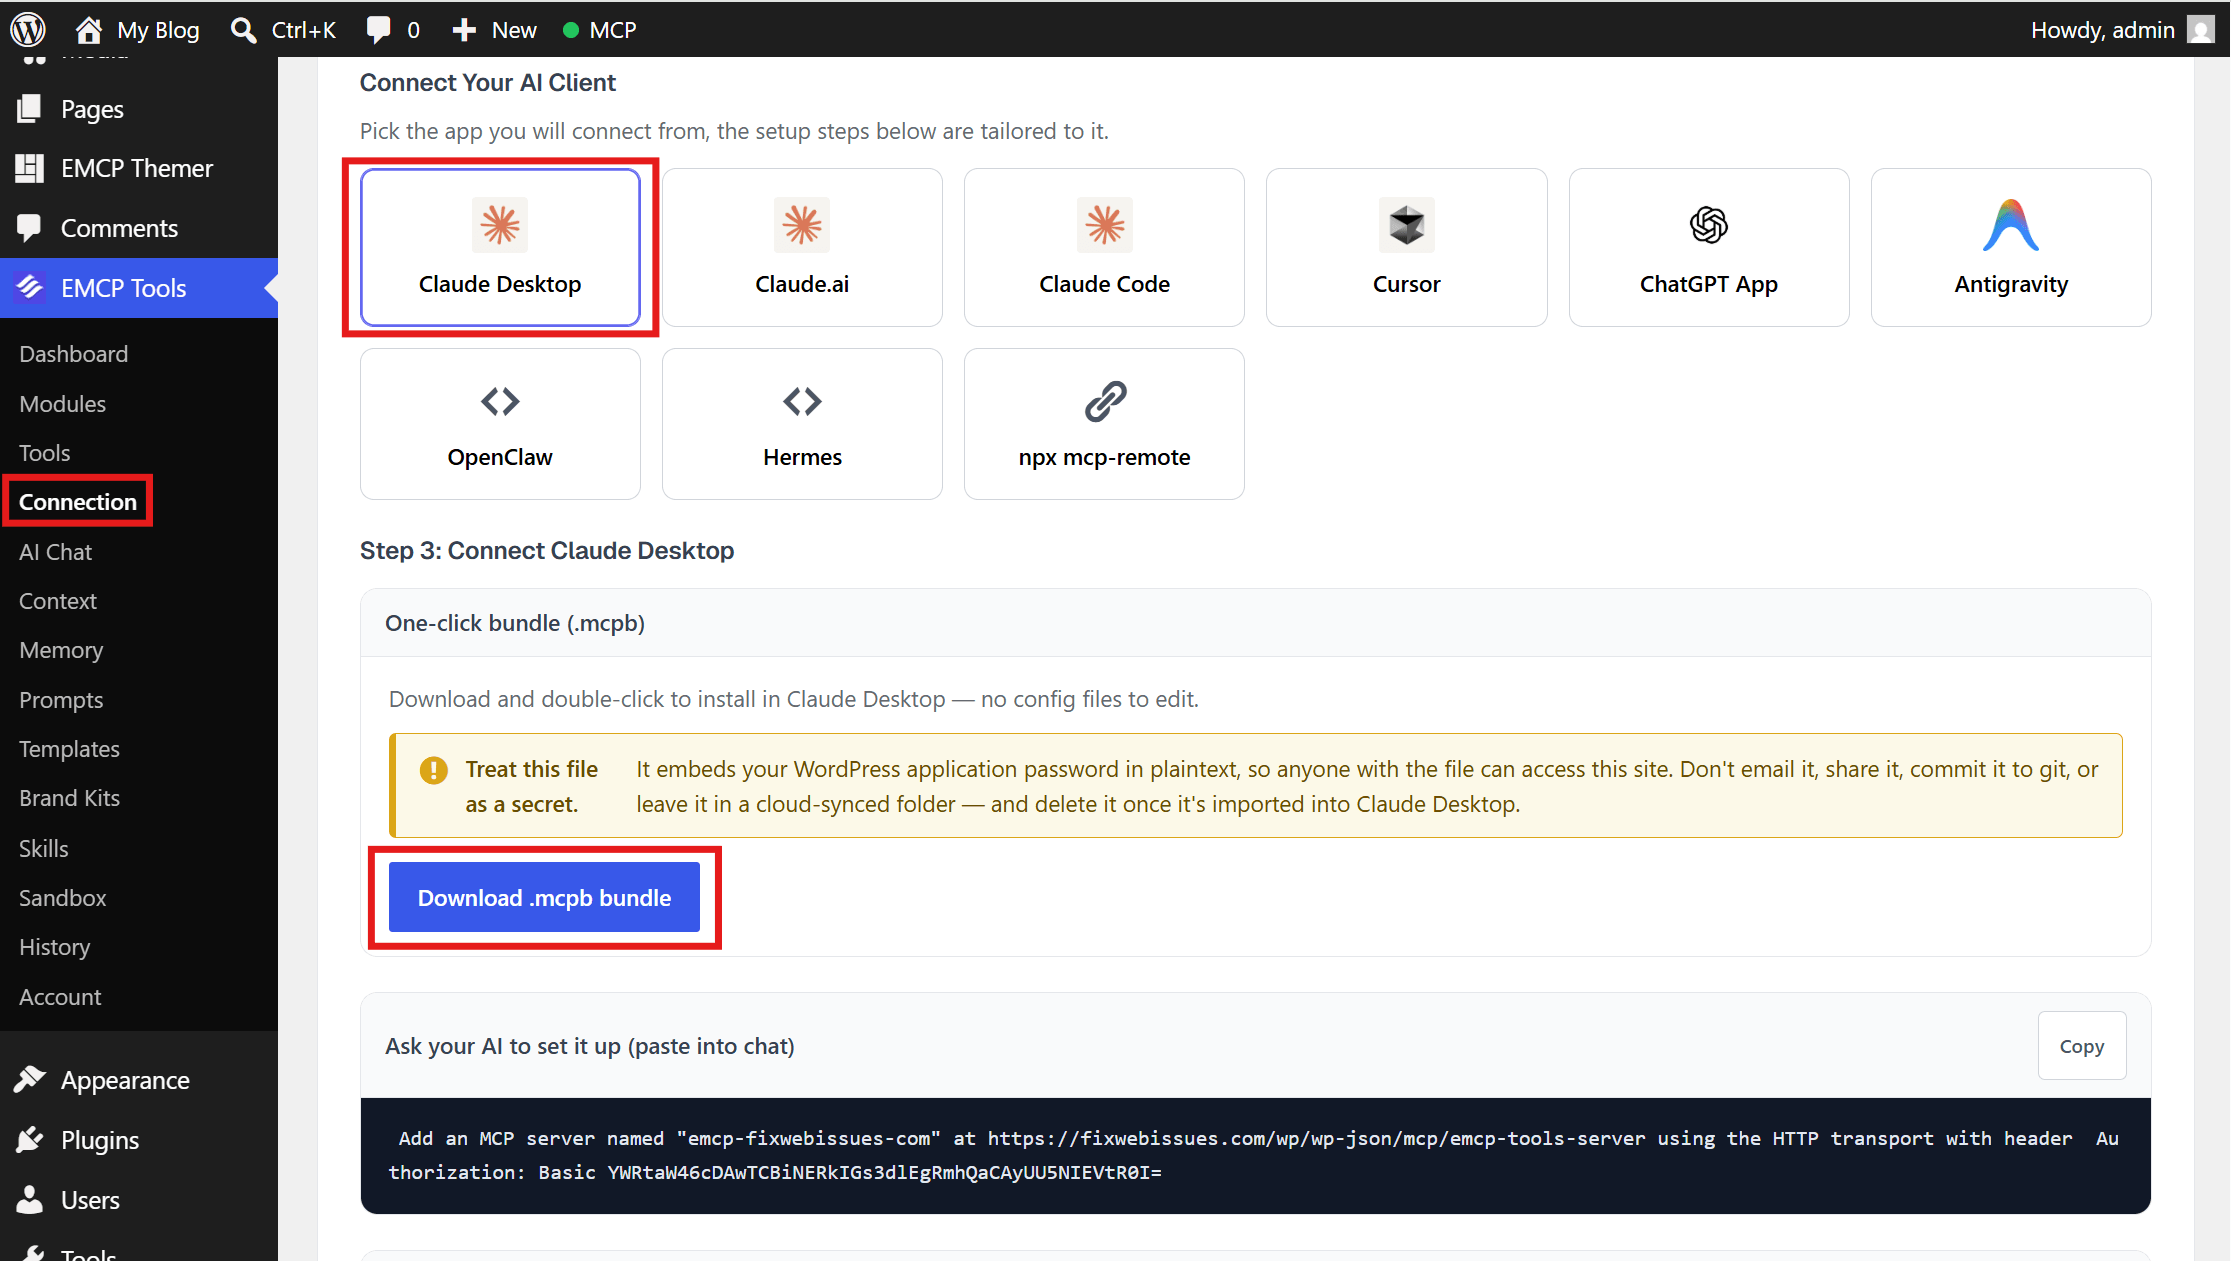
The bundle is an MCPB package with your site URL and a fresh Application Password baked in. It’s fully self-contained: it ships a single server/index.js (the proxy compiled to CommonJS with your credentials embedded) that runs on Claude Desktop’s built-in Node.js: nothing to install, no npx, no separate Node.js on your machine, no PATH setup. The baked-in URL honors the Server URL override under EMCP Tools → Connection → Advanced settings, so a staging site with a pinned domain still gets a working bundle.
The
.mcpbfile contains a live credential. Delete it after importing. Revoke or rotate the password any time under Users → Profile → Application Passwords.
If you’d rather configure it by hand, the manual options below still work.
Sign in with OAuth (custom connector)
Section titled “Sign in with OAuth (custom connector)”For a remote HTTPS site, add EMCP Tools as a custom connector: sign in through the browser, with no password or proxy to set up. In the Connection wizard, choose Claude Desktop and OAuth: step 3 shows these steps with the connector name and server URL ready to copy. The Claude.ai entry offers the same connector with an Add the connector to claude.ai button, which works in the browser and in Claude Desktop.
-
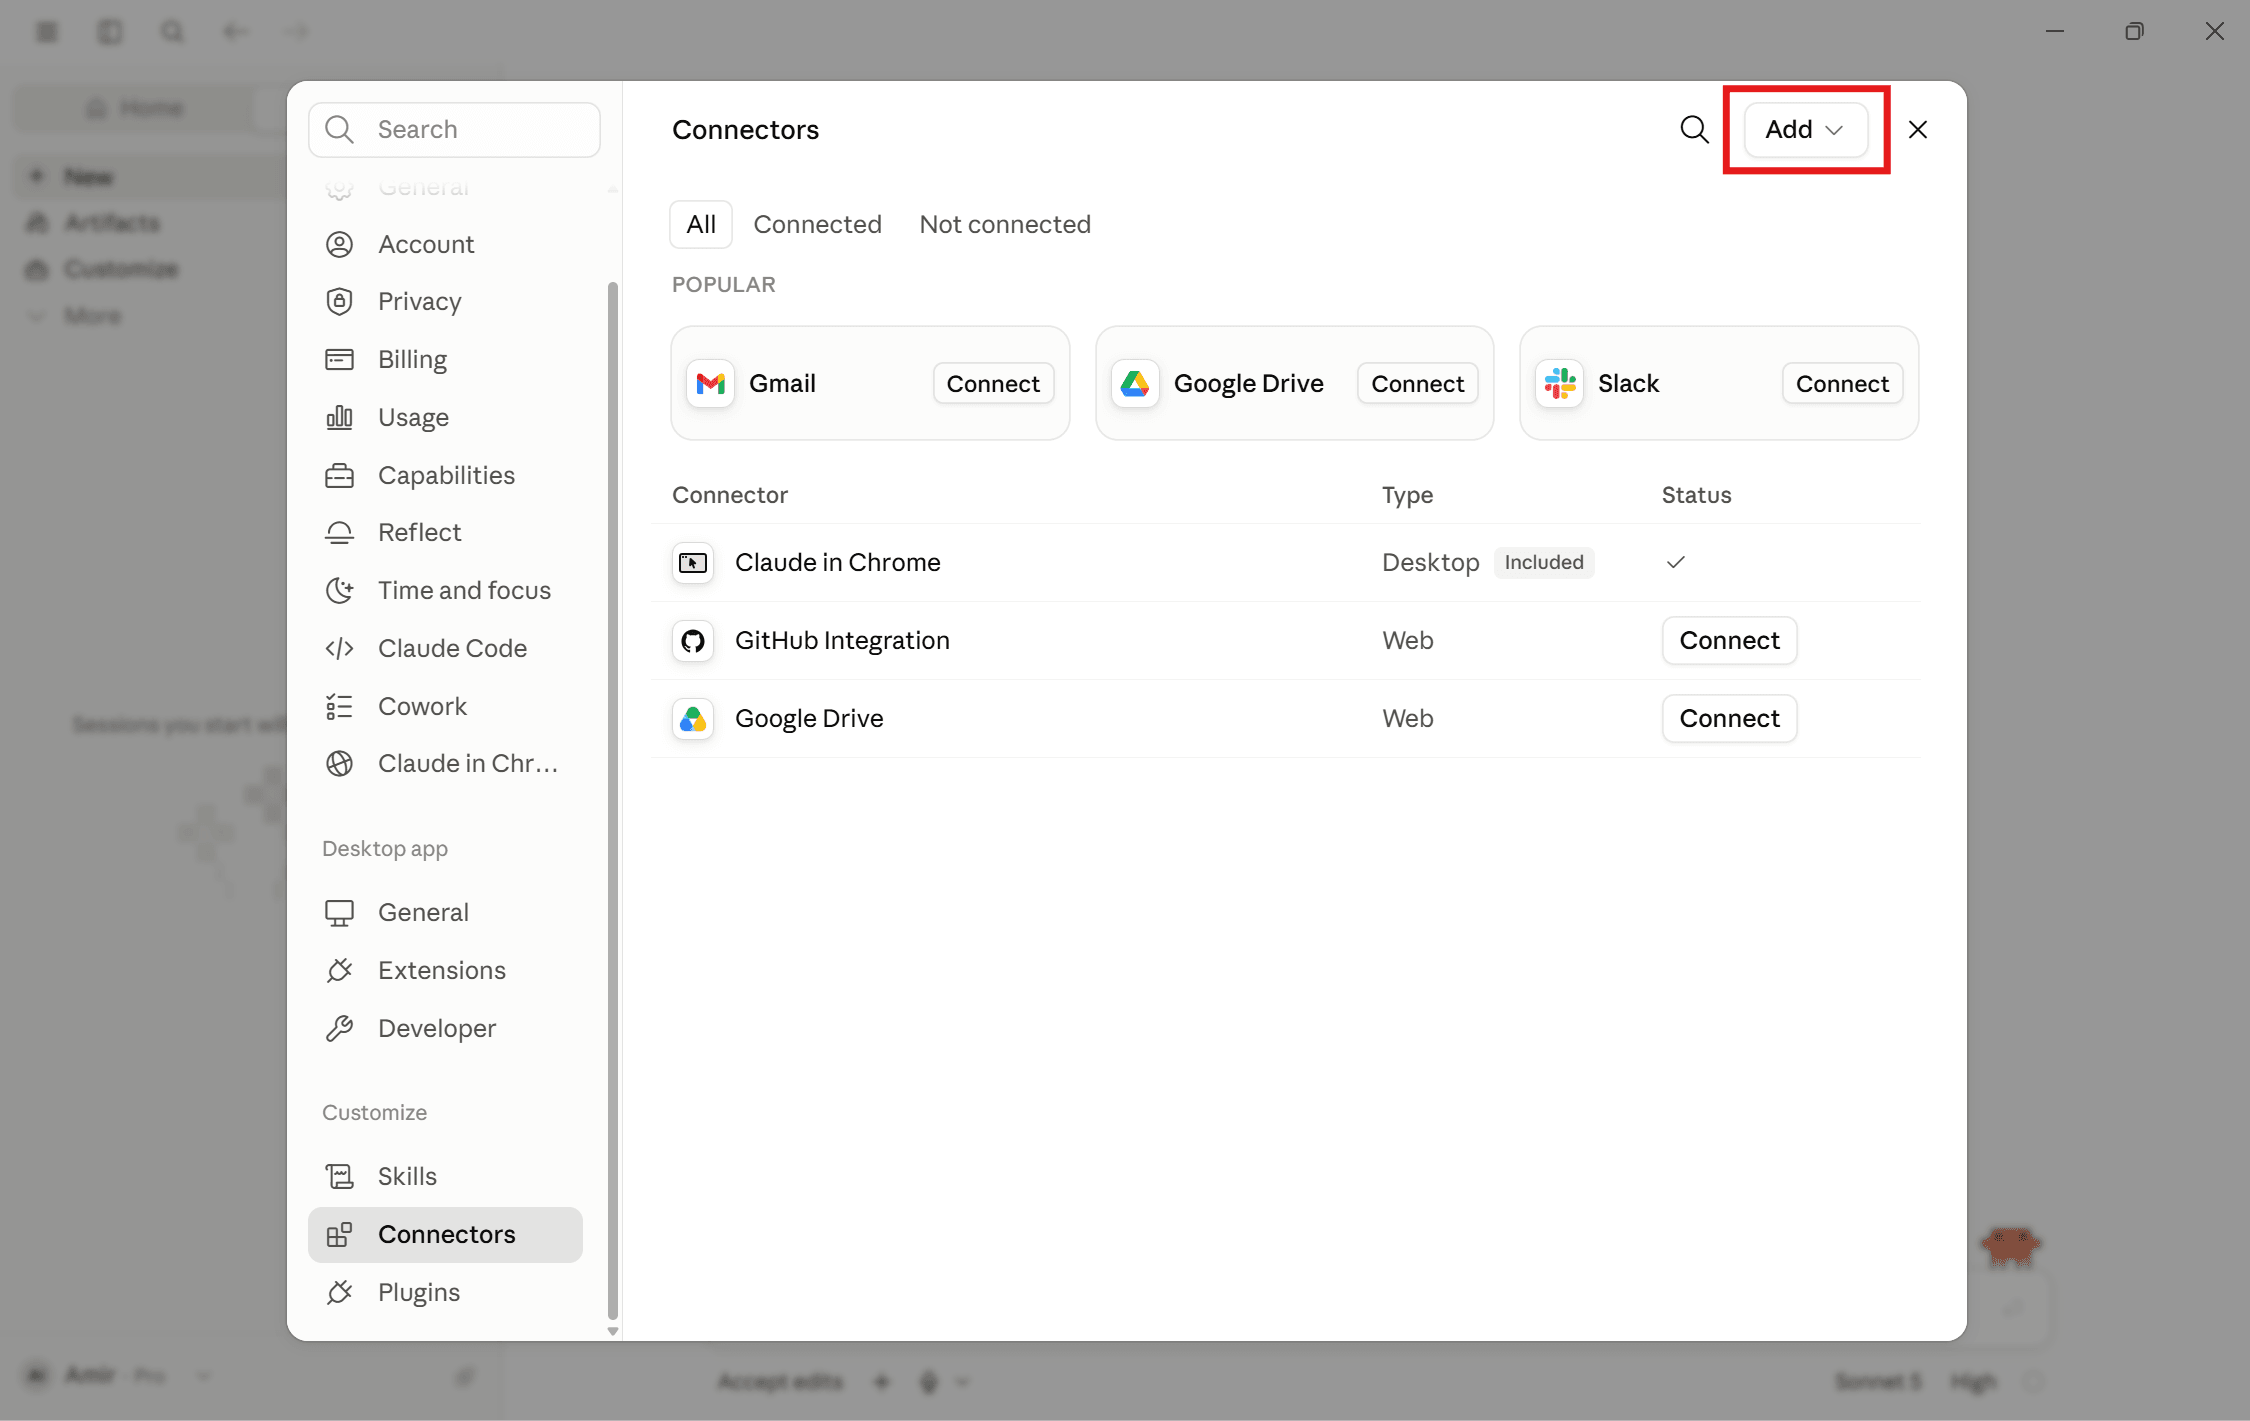
In Claude Desktop, open Settings → Connectors and click Add custom connector.
-
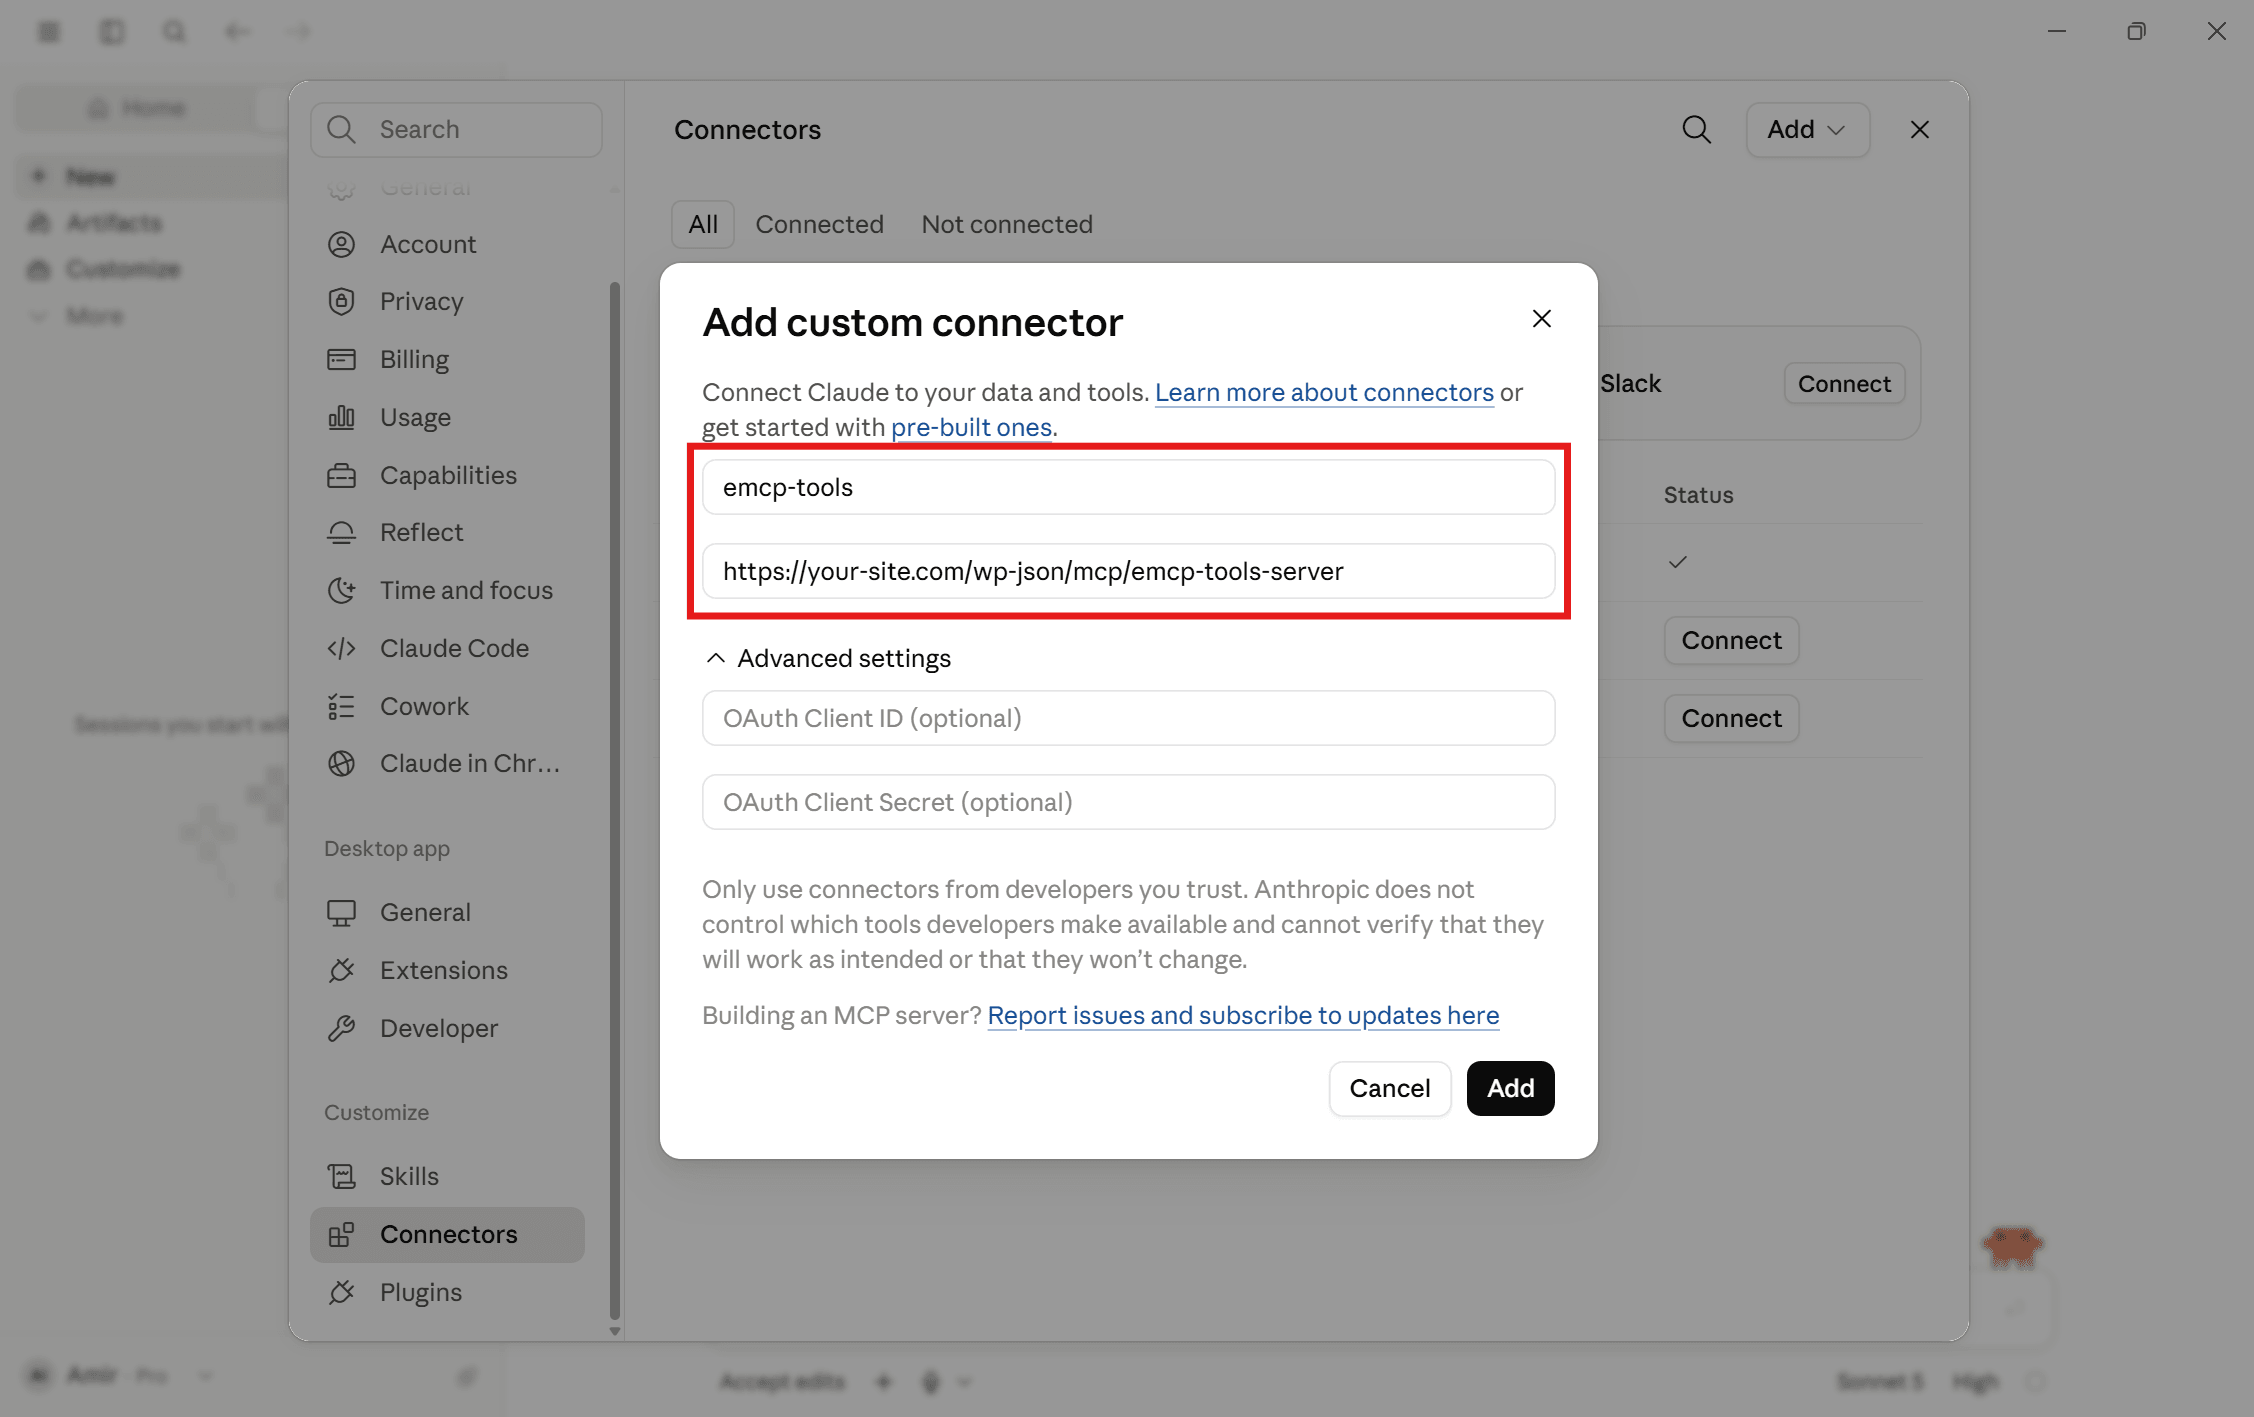
Give it a name (e.g.
emcp-tools) and paste your server URL:https://your-site.com/wp-json/mcp/emcp-tools-server -
Leave the OAuth Client ID and Secret (under Advanced) empty, then save.
-
When your browser opens, approve the connection from your WordPress login.
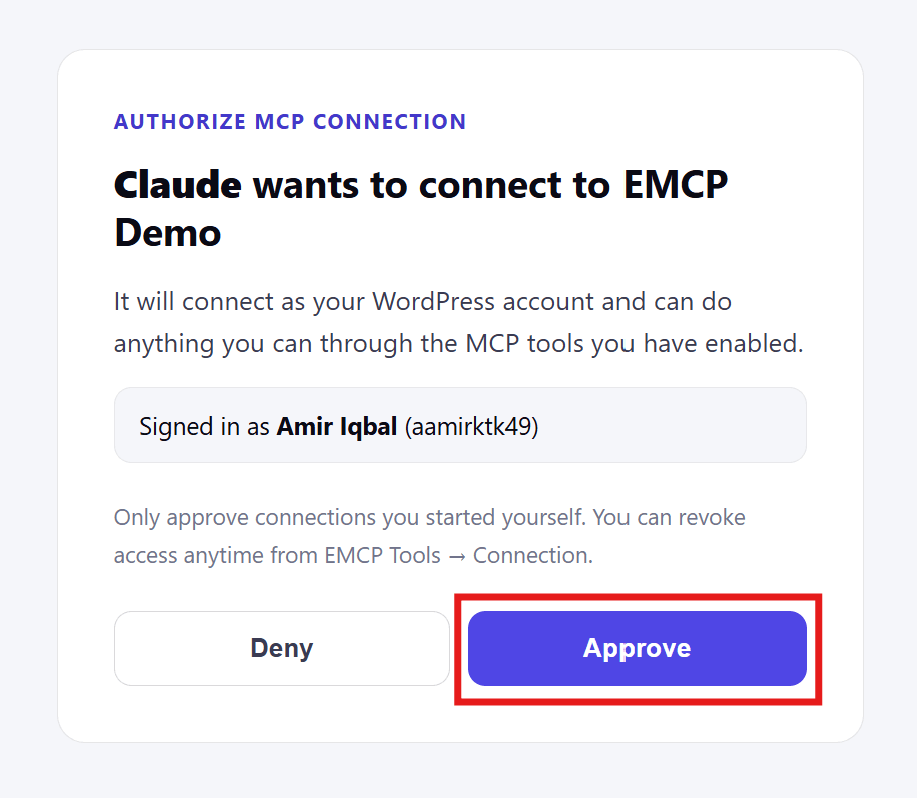
Requires an HTTPS site with OAuth sign-in on (EMCP Tools → Connection → Advanced settings, on by default on HTTPS). Only administrators can approve; sign the app out or remove it any time under EMCP Tools → Connection → Connected apps. Custom connectors need a recent Claude Desktop build, if you don’t see the option, use the bundle above or the manual config below.
Manual configuration
Section titled “Manual configuration”Claude Desktop reads MCP server configs from claude_desktop_config.json. Location:
- Windows:
%APPDATA%\Claude\claude_desktop_config.json - macOS:
~/Library/Application Support/Claude/claude_desktop_config.json - Linux:
~/.config/Claude/claude_desktop_config.json
The manual local-server configuration below uses stdio. Use WP-CLI on the same machine or the bundled Node.js proxy for that route; the OAuth connector described above connects to a remote HTTPS site. With Application password chosen, step 3 of the Connection wizard also shows an “Ask your AI to set it up” prompt and ready-filled Node proxy (npx) and direct HTTP configs for this file.
stdio via WP-CLI (best for local WordPress)
Section titled “stdio via WP-CLI (best for local WordPress)”On a site whose environment type is local or development, the Connection wizard offers WP-CLI on this computer in step 2 and generates this entry for you, with an extra EMCP_SETUP value in env that only lets step 4 recognise the first call (leaving it in is harmless). The command it uses comes from the WP-CLI command field under EMCP Tools → Connection → 3rd-party services.
{ "mcpServers": { "emcp-tools": { "command": "wp", "args": [ "mcp-adapter", "serve", "--server=emcp-tools-server", "--user=admin", "--path=/absolute/path/to/wordpress" ] } }}On Windows with Laragon, use the full path to php.exe and wp-cli.phar:
{ "mcpServers": { "emcp-tools": { "command": "C:\\laragon\\bin\\php\\php-8.4.15-nts-Win32-vs17-x64\\php.exe", "args": [ "C:\\wp-cli\\wp-cli.phar", "mcp-adapter", "serve", "--server=emcp-tools-server", "--user=admin", "--path=C:\\laragon\\www\\your-site" ] } }}Restart Claude Desktop after editing the config.
Node.js HTTP proxy (best for remote WordPress)
Section titled “Node.js HTTP proxy (best for remote WordPress)”Use this when WordPress is on a remote server (e.g. shared hosting) but Claude Desktop is on your laptop. Claude Desktop launches the proxy as a local subprocess and talks to it over stdio, so the proxy file must live on the same machine as Claude Desktop, not on the server. There’s no way for Claude Desktop to execute a file that only exists on your WordPress host.
You have two ways to run it: the zero-install npx runner (recommended), or a local copy of the proxy file.
Option 1: npx runner (recommended, nothing to maintain)
Section titled “Option 1: npx runner (recommended, nothing to maintain)”npx downloads and runs the proxy on demand and always fetches the latest version, so there’s nothing to copy or keep in sync as the plugin updates:
{ "mcpServers": { "emcp-tools": { "command": "npx", "args": ["-y", "@msrbuilds/emcp-proxy@latest"], "env": { "WP_URL": "https://your-site.com", "WP_USERNAME": "admin", "WP_APP_PASSWORD": "xxxx xxxx xxxx xxxx xxxx xxxx", "MCP_PROTOCOL_VERSION": "2024-11-05" } } }}Requires Node 18+ on the laptop running Claude Desktop. The first launch on a cold cache takes a moment while npx fetches the package; subsequent launches are cached.
Option 2: local copy of the proxy file
Section titled “Option 2: local copy of the proxy file”If you’d rather not use npx, the proxy ships in the plugin ZIP at bin/mcp-proxy.mjs. Extract that one file from the ZIP, save it anywhere on your laptop (e.g. C:\mcp\mcp-proxy.mjs or ~/mcp/mcp-proxy.mjs), and point args at that local path, not at the copy inside wp-content/plugins/... on your server:
{ "mcpServers": { "emcp-tools": { "command": "node", "args": ["C:\\local\\path\\to\\mcp-proxy.mjs"], "env": { "WP_URL": "https://your-site.com", "WP_USERNAME": "admin", "WP_APP_PASSWORD": "xxxx xxxx xxxx xxxx xxxx xxxx", "MCP_PROTOCOL_VERSION": "2024-11-05" } } }}The proxy is a single zero-dependency file, so a local copy keeps working against newer plugin versions as long as the server endpoint is unchanged, but you’ll need to re-extract it manually to pick up proxy fixes. Use Option 1 if you’d rather not track that.
Why MCP_PROTOCOL_VERSION?
Section titled “Why MCP_PROTOCOL_VERSION?”The MCP Adapter reports protocol version 2025-06-18, which some Claude Desktop builds reject during initialize. Setting MCP_PROTOCOL_VERSION to 2024-11-05 makes the proxy rewrite the version in the handshake so the connection succeeds. If your Claude Desktop build connects without it, you can drop the line.
The proxy handles WordPress’s Mcp-Session-Id header lifecycle automatically, and auto-detects pretty vs. plain permalinks. Node 18+ required on the client.
Verify
Section titled “Verify”After restarting Claude Desktop, step 4 of the Connection wizard should show “Claude Desktop is connected”. In Claude Desktop, click the slider icon next to the chat input. You should see emcp-tools listed under “Available tools” with a non-zero tool count.
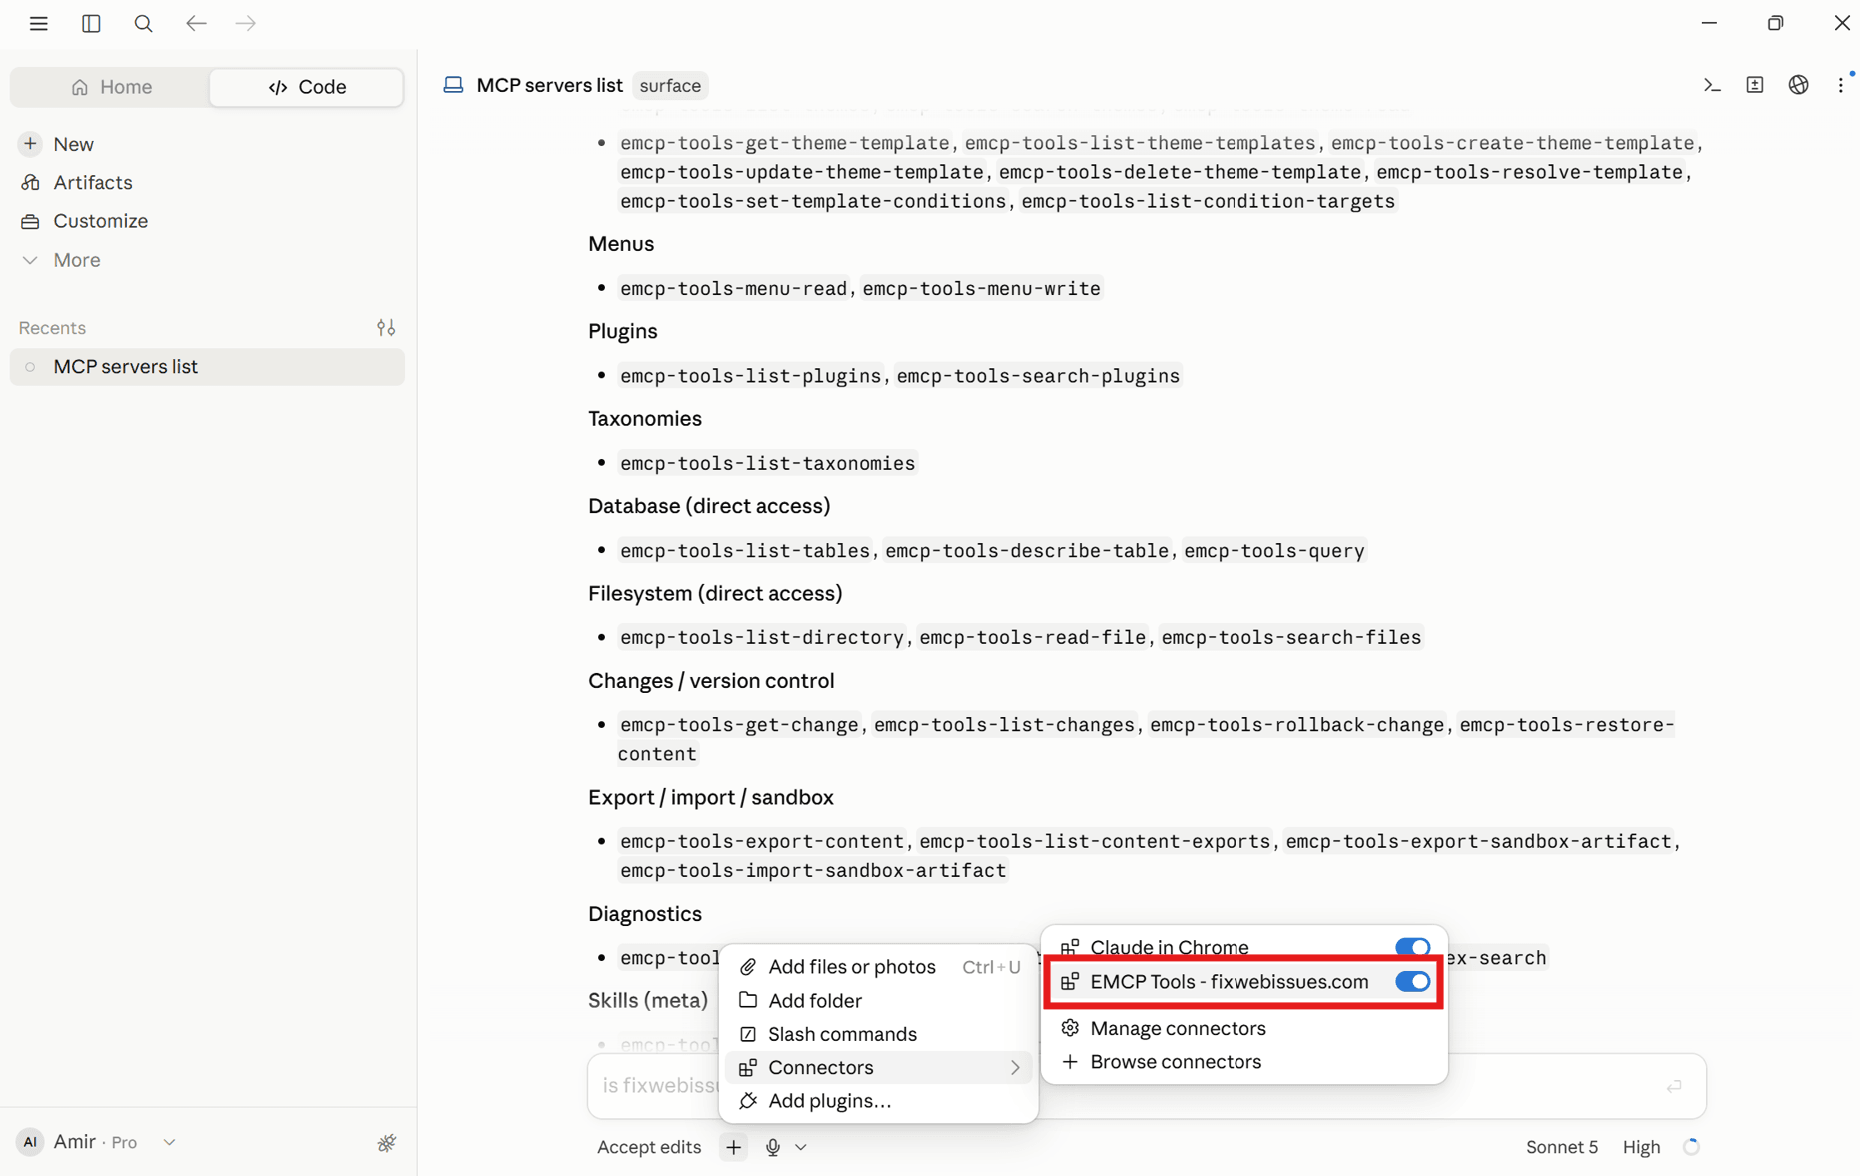
If the server doesn’t appear, open the Claude Desktop logs:
- Windows:
%APPDATA%\Claude\Logs\mcp.log - macOS:
~/Library/Logs/Claude/mcp.log
Common errors:
wp: command not found→ use full paths tophp.exeandwp-cli.phar.Connection refused→ WordPress isn’t running or the URL is wrong.401 Unauthorized→ application password is wrong or has expired.
Try a read-only WordPress task
Section titled “Try a read-only WordPress task”List the WordPress pages I can access. Show their titles, IDs and publication status. Do not create, update or delete anything.
A successful connection should return records from your own site, not a proposed page list. If the tool is unavailable, check the Tools screen and the connected user’s permissions. If you use compact mode, ask the assistant to discover the page-listing tool first.
Once that works, choose an Elementor workflow or a WooCommerce workflow, check its requirements, and enable only the writes needed for the task. Use a draft or test item and inspect the result before publishing.
For a complete Elementor example, follow Build your first Elementor page: a concrete brief, one saved draft, desktop/mobile review and a targeted revision.
Connection and discovery help
Section titled “Connection and discovery help”If the server is unreachable, returns no tools, or lists fewer tools than expected, follow missing-tool diagnosis. Check the failing stage before changing the enabled catalog.