
Connect Cursor to WordPress with MCP
Connect Cursor to your WordPress site through EMCP to inspect content and use the tools enabled for your user. Elementor page editing requires the supported Elementor version; other integrations have their own dependencies.
Before you connect
Section titled “Before you connect”- Install EMCP and confirm the WordPress and PHP requirements.
- For remote connections, use your site’s complete server URL from EMCP Tools → Connection. OAuth requires HTTPS and an administrator to approve access.
- Keep sensitive writes disabled while verifying the connection. Tool availability depends on your tier, installed integrations and WordPress permissions.
Choose project or global configuration
Section titled “Choose project or global configuration”Use .cursor/mcp.json inside the project folder for a client-specific workflow. Use ~/.cursor/mcp.json for a personal server you want available across projects. Give servers distinct names such as client-staging and client-production, and check for duplicate entries when troubleshooting.
A project config organizes connections; it does not restrict WordPress permissions or isolate site-wide tool settings. Check which global servers are also available before editing. Keep credential-bearing configuration out of Git. OAuth configuration can contain only the endpoint, but each user must authenticate separately.
The examples below follow Cursor’s MCP configuration documentation, reviewed September 26, 2026. Settings labels may differ by Cursor version; open its MCP management screen (currently under Customize) and inspect the configured server.
Sign in with OAuth (recommended)
Section titled “Sign in with OAuth (recommended)”Save this in the configuration file you chose above, replacing the URL with your Connection screen endpoint. Cursor can then start the browser sign-in:
{ "mcpServers": { "emcp-tools": { "url": "https://your-site.test/wp-json/mcp/emcp-tools-server" } }}Open Cursor’s MCP settings; when the server connects, your browser opens to approve access from your WordPress login.
The EMCP Tools → Connection screen builds this for you. Choose Cursor in step 1 (“Choose your AI client”) and OAuth in step 2 (“Pick how it signs in”). Step 3 (“Add EMCP to Cursor”) offers a One-click install button that opens Cursor with the server filled in, the two config locations (~/.cursor/mcp.json global, .cursor/mcp.json project) and the config to copy. Click I’ve added it, continue; step 4 (“Test the connection”) waits for Cursor’s first MCP call and confirms it. The wizard names the server after your site, for example emcp-your-site-com.
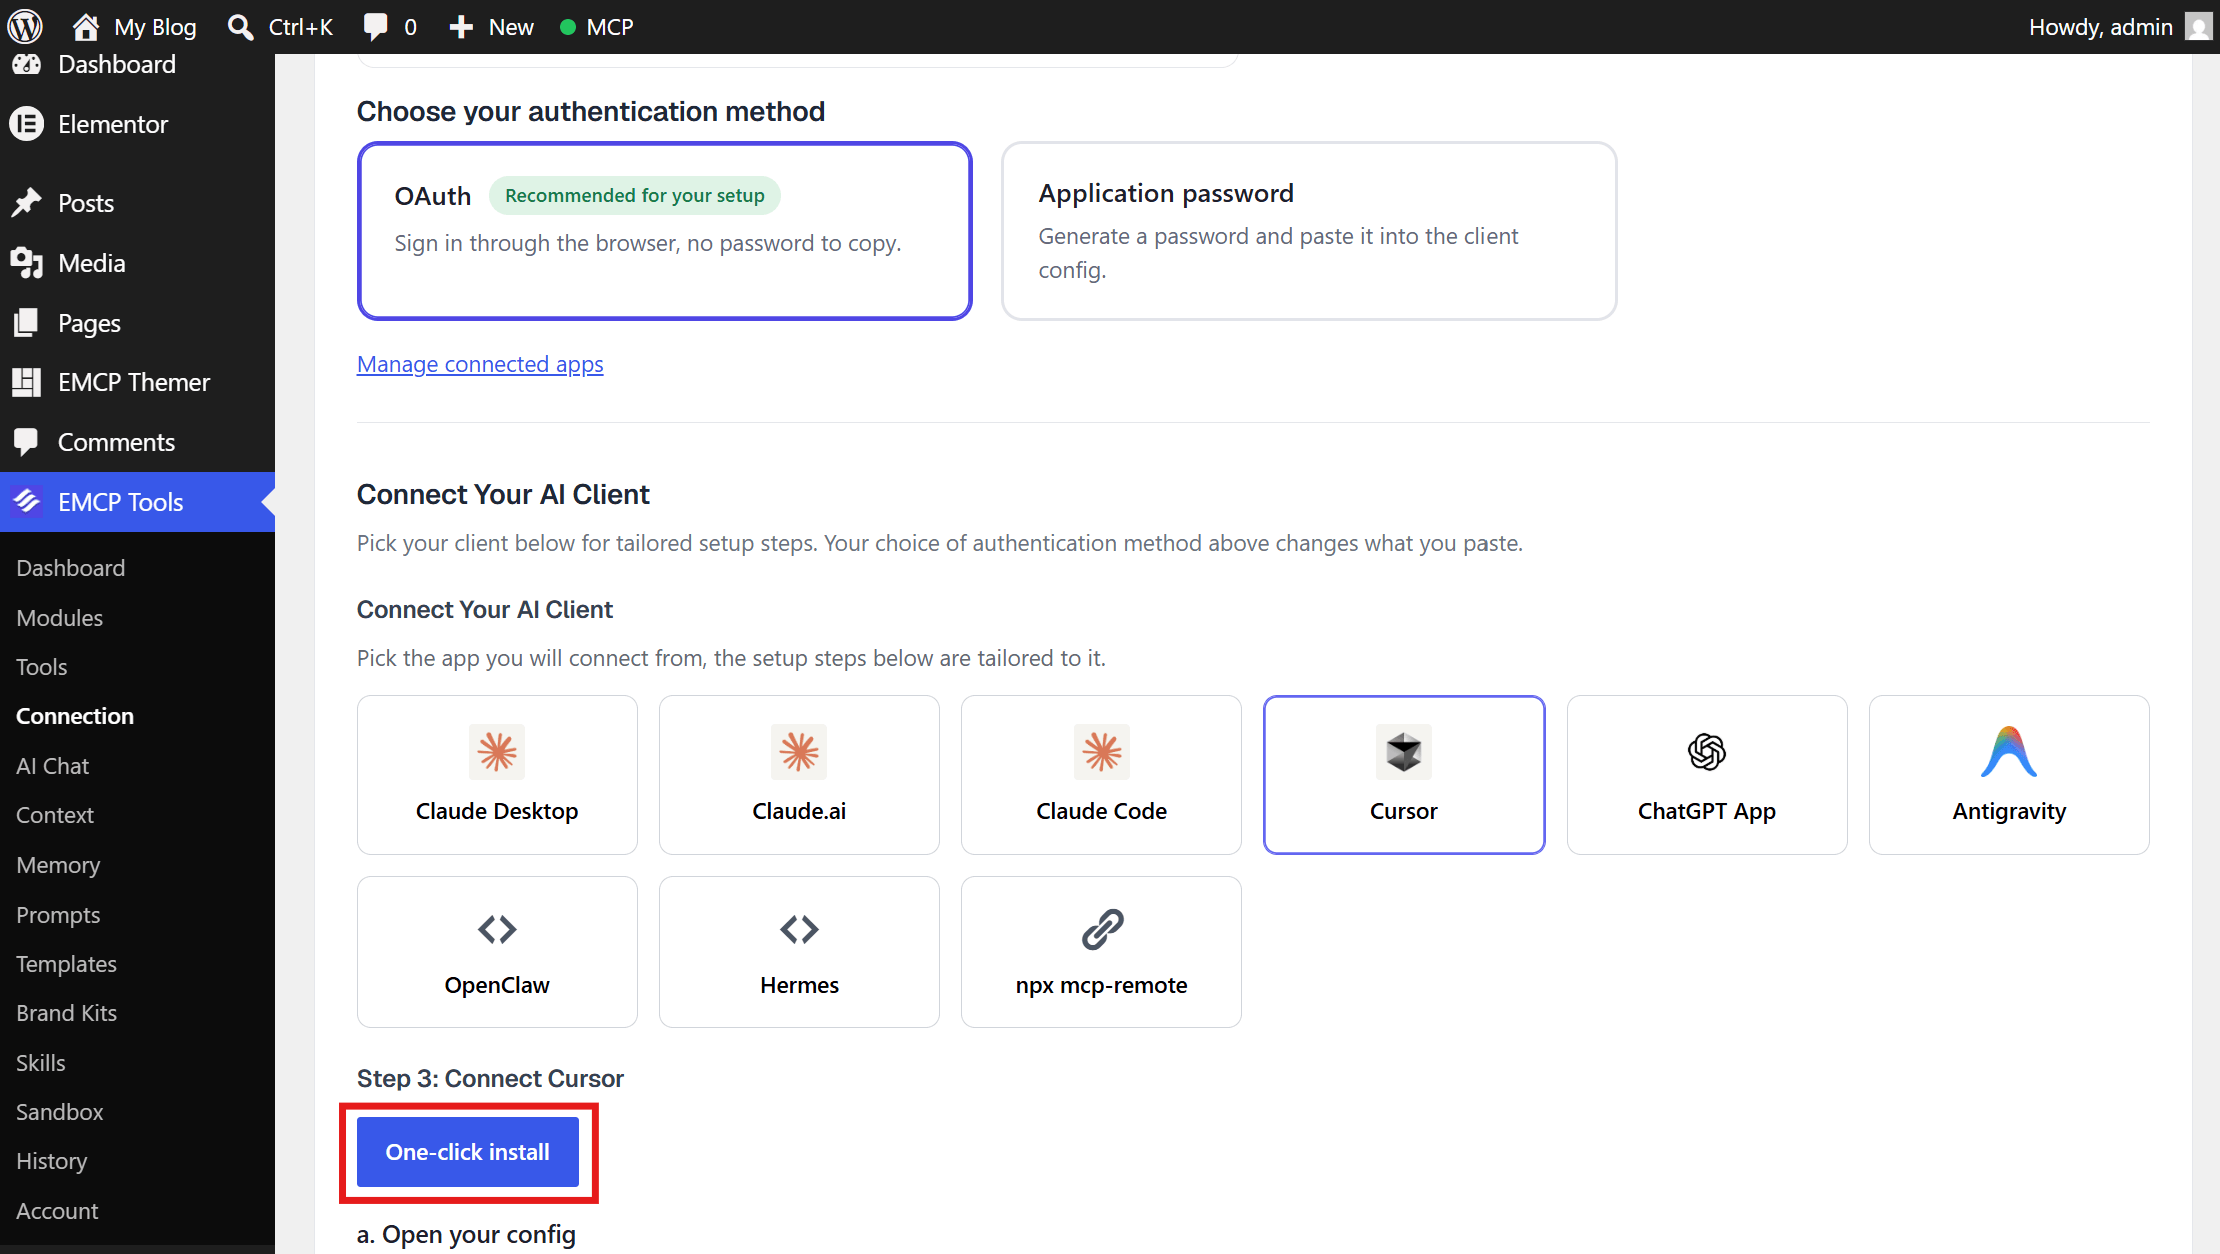
Requires an HTTPS site with OAuth sign-in on (EMCP Tools → Connection → Advanced settings, on by default on HTTPS). Only administrators can approve. Sign the app out or remove it any time under EMCP Tools → Connection → Connected apps.
HTTP with an Application Password
Section titled “HTTP with an Application Password”{ "mcpServers": { "emcp-tools": { "url": "https://your-site.test/wp-json/mcp/emcp-tools-server", "headers": { "Authorization": "Basic BASE64_ENCODED_CREDENTIALS" } } }}Generate the base64 credentials:
echo -n "admin:xxxx xxxx xxxx xxxx xxxx xxxx" | base64(Application passwords come from WordPress admin → Users → Profile → Application Passwords.) Base64 is encoding, not encryption: the header is a credential. Do not commit it, paste it into chat, or include it in screenshots. Use a separate revocable Application Password for this connection.
The EMCP Tools → Connection screen fills this in for you: choose Cursor, then Application password, then click Create password in step 3 (it is shown once; the configs already contain it), or open Use a password I already have. Step 3 shows the direct HTTP config and an “Ask your AI to set it up” prompt; both contain the credential, so treat them as secrets.
On a local or development site, step 2 also offers WP-CLI on this computer, which gives a stdio config that starts WP-CLI directly (see WP-CLI bridge).
Verify
Section titled “Verify”Step 4 of the Connection wizard shows “Cursor is connected” once the first call arrives. Then open Cursor’s MCP management screen and inspect the server. Confirm it connects and lists tools. The screenshot below shows an earlier settings layout; labels and status indicators can differ by version.
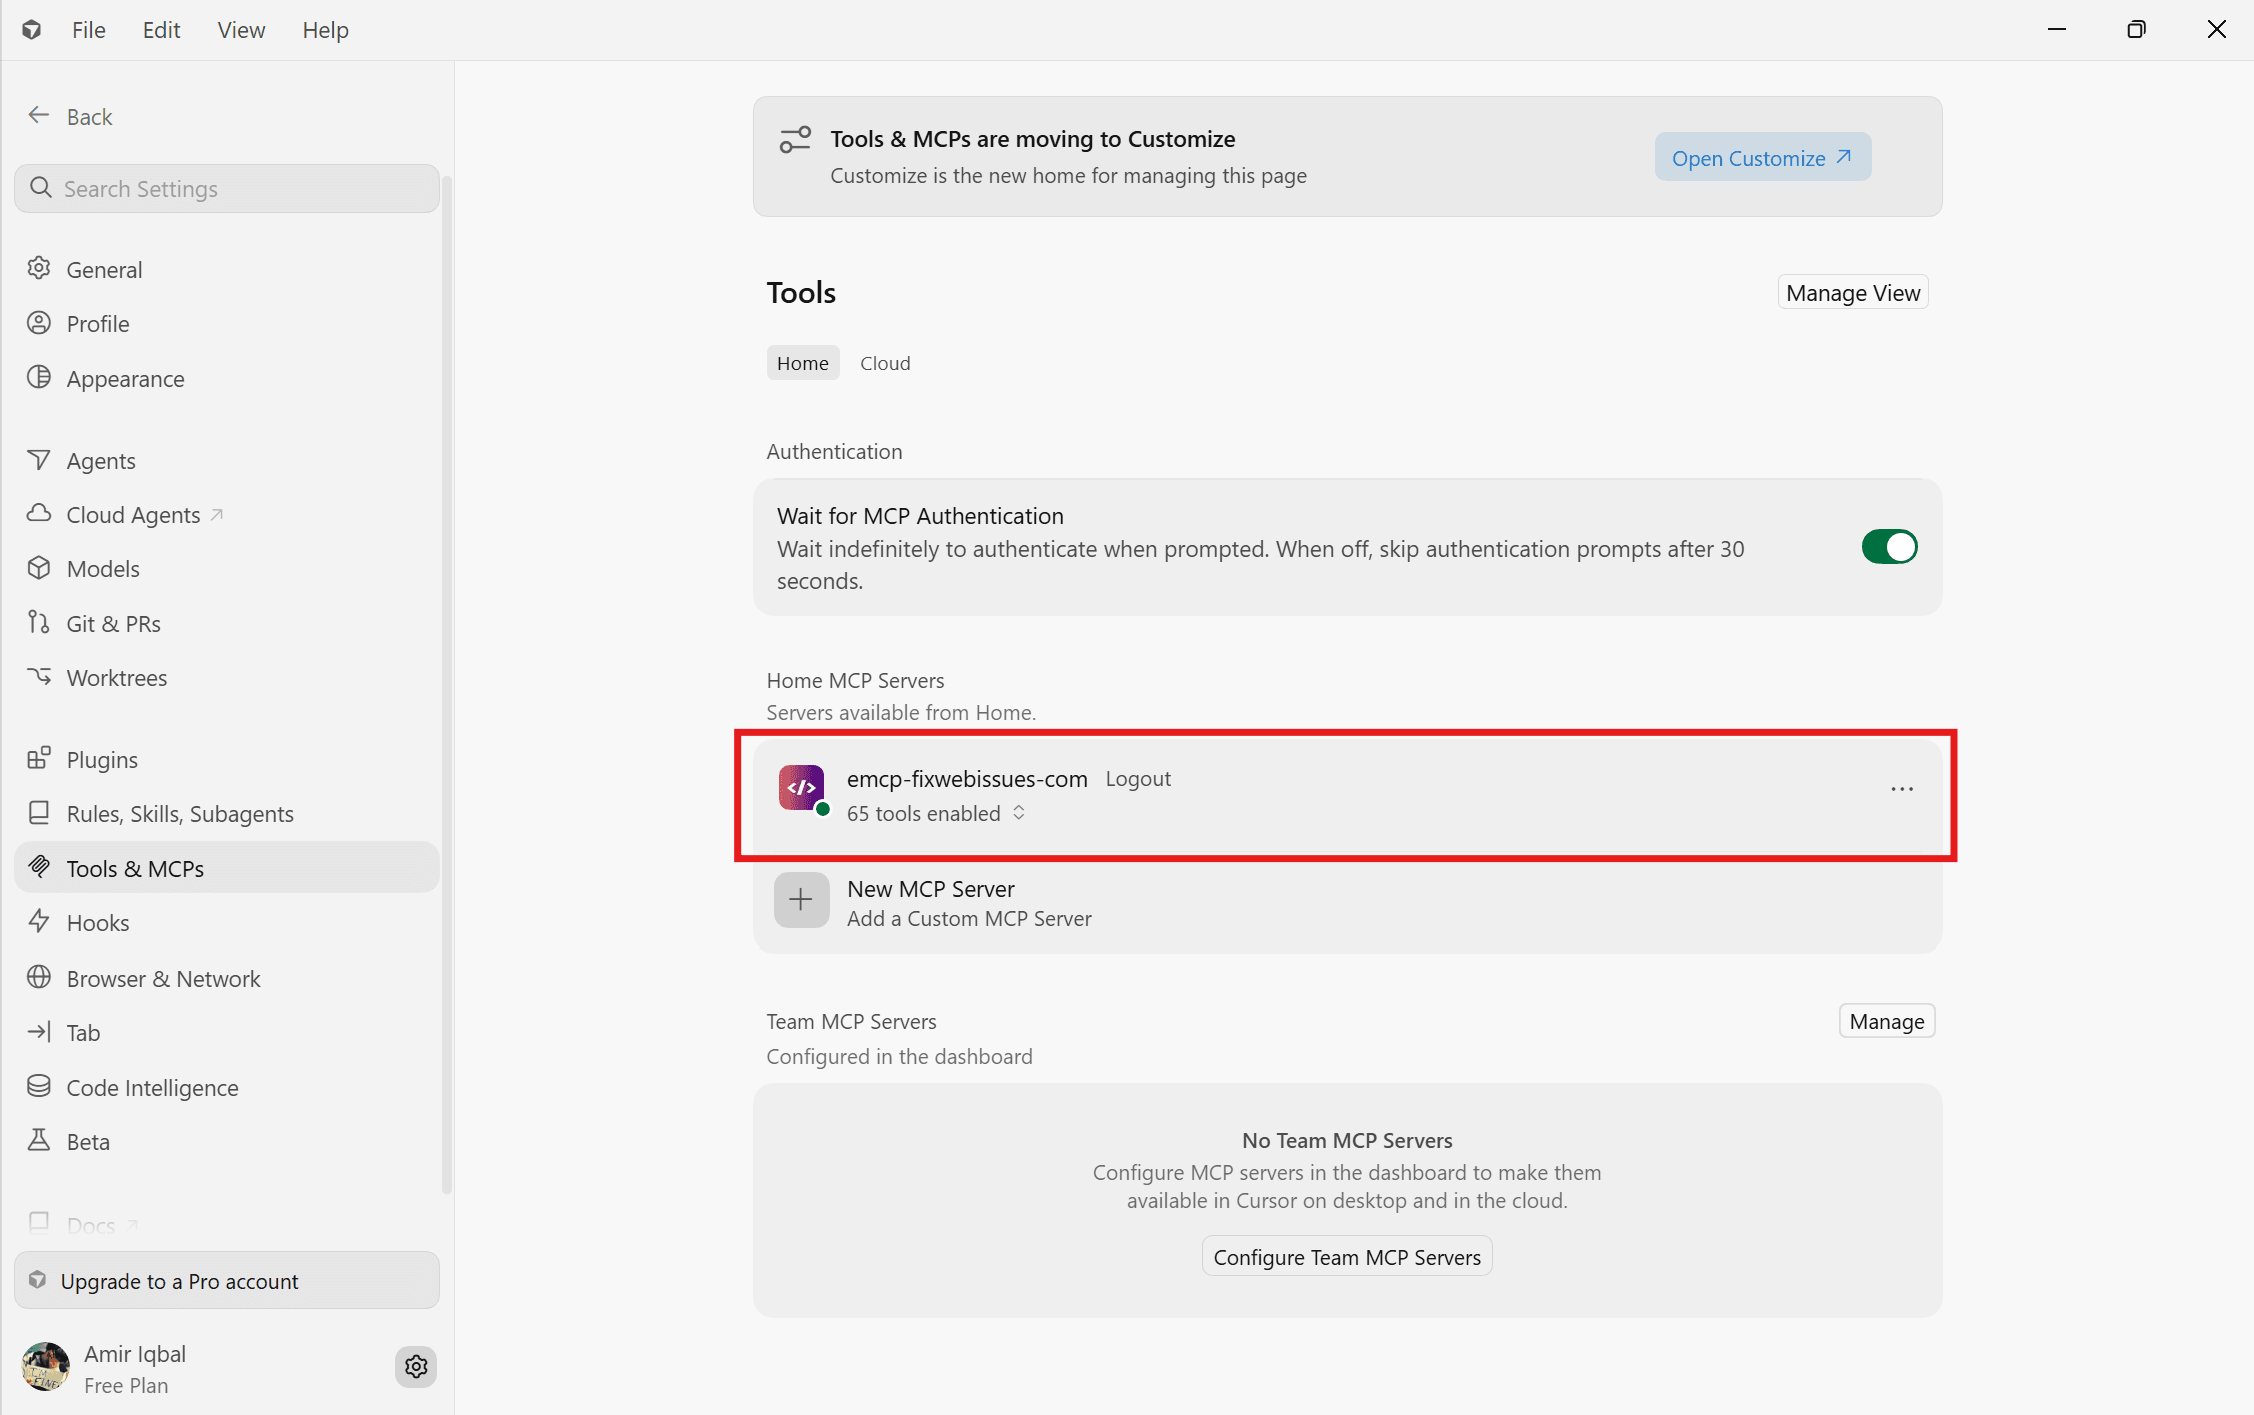
If it shows red, click the entry to see the error. Most common:
Network error: check the endpoint, HTTPS and network access. Follow the connection test; opening an endpoint in a browser does not test the MCP handshake.401 Unauthorized: check missing, invalid or revoked credentials and whether the host forwards the Authorization header.403 Forbidden: inspect the response for access restrictions or firewall rules. See authentication errors; individual operations have their own permission checks.Server returned 0 tools: discovery returned no usable tools; this alone does not identify the cause. See No tools appearing.
Tool budget
Section titled “Tool budget”EMCP can expose up to 526 tools, depending on the site. Discovery and context handling depend on your Cursor version and selected model. If a large catalog fails to load or adds overhead, try Compact tool mode. It collapses the surface to 3 dispatcher tools (list-tools, get-tool-schema, call-tool) that discover and call enabled operations on demand. Follow tool-limit diagnosis before assuming a numeric cap.
Try a read-only WordPress task
Section titled “Try a read-only WordPress task”List the WordPress pages I can access. Show their titles, IDs and publication status. Do not create, update or delete anything.
A successful connection should return records from your own site, not a proposed page list. If the tool is unavailable, check the Tools screen and the connected user’s permissions. If you use compact mode, ask the assistant to discover the page-listing tool first.
Once that works, choose an Elementor workflow or a WooCommerce workflow, check its requirements, and enable only the writes needed for the task. Use a draft or test item and inspect the result before publishing.
Project workflow: one reviewed draft edit
Section titled “Project workflow: one reviewed draft edit”For an executed example of the editing and verification steps, see our tested Elementor page-editing tutorial, including native widgets, working anchors and responsive screenshots. It is an EMCP workflow demonstration, not a claim that this Cursor-specific setup was tested in that session.
This is a workflow to run on your own staging site, not a transcript of a Cursor test. The sample title below is fictional; substitute your site’s real URL and a draft you are allowed to edit. For a worked build with screenshots, use Build your first Elementor page or the Elementor integration demo.
- Identify
Confirm the site URL and draft page ID.
- Inspect
Read the current heading and exact element.
- Edit
Approve one change and read it back.
- Review
Check desktop, mobile and draft status.
1. Confirm the destination and page
Section titled “1. Confirm the destination and page”Start with a read-only request. A friendly server name is not proof of the connected site’s identity.
Use only the client-staging connection. Report the connected WordPress site URL, then find the page titled “Services: review draft”. Show its page ID, status and permalink. Read its current content and identify whether it uses Elementor. Do not change anything. If the URL differs from my staging site or more than one page matches, stop and report the ambiguity.
Compare the result with WordPress admin. Record the exact site URL and page ID; IDs can repeat across different sites. If the page is published, create or select a separate draft through your normal review process before continuing.
2. Inspect before proposing a change
Section titled “2. Inspect before proposing a change”Read this draft’s current heading and layout. For Elementor, inspect the element structure and identify the exact heading widget ID. Propose changing only the heading text to “Services built around your business”. Show the current and proposed text. Do not save yet.
The agent should use the appropriate content or Elementor tools, not assume the rendered heading can be edited through ordinary post content. If a tool is unavailable, check dependencies, tier, permissions and the saved tool settings. Enable only the required operation. A prompt asking for review is a workflow instruction, not a server-enforced permission boundary.
3. Save one bounded change
Section titled “3. Save one bounded change”After reviewing the proposal, send the exact target identifiers returned by the read:
On the confirmed staging URL and draft page ID, apply only the heading-text change we reviewed. Preserve the draft status, layout, styles, links and other content. Do not publish or edit another page. Read the saved heading and page status back afterward, and return the preview link.
Check the requested tool and arguments before allowing the edit in Cursor. If the response reports a timeout, read the page again before retrying: the write may already have completed. A suggested change or successful-looking chat message is not saved-state evidence.
4. Review and hand off
Section titled “4. Review and hand off”| Check | Evidence to collect |
|---|---|
| Correct destination | Site URL and exact page ID match your staging draft. |
| Saved change | Readback shows the new heading and draft status. |
| Visual result | Open the authenticated preview at desktop and mobile widths; check wrapping, spacing and unchanged neighboring content. |
| Editable structure | For Elementor, open the editor and verify the intended heading widget remains editable. |
| Scope | Compare before/after content; confirm no extra page, setting or publication change occurred. |
Ask for a short handoff: URL, page ID, changed element, before/after text, remaining issues and publication status. If the result needs correction, request one specific revision and repeat the readback and preview checks. Review the appropriate revision or backup before reverting; a Git checkout does not undo a change saved in WordPress.
Working across client sites
Section titled “Working across client sites”Keep staging and production connections clearly named. Reconfirm the site and page after switching; do not reuse an ID from another site. The multi-site proxy guide describes explicit site selection and per-call routing if you use a registry. A hosted gateway is a different connection route, so verify its destination and authentication too.
For shared projects, record non-secret target details and review instructions in the project documentation. Never store passwords, tokens or private page exports there. See secure WordPress AI setup for access and revocation guidance.
When the workflow stops
Section titled “When the workflow stops”- Cannot connect or no tools: follow missing-tool diagnosis.
- Tools list successfully but an edit is denied: inspect the specific tool setting and connected user’s permissions; reconnecting does not grant access.
- Three tools instead of the full catalog: use the Compact mode discovery flow.
- Wrong site or unexpected page status: stop writes, correct the connection or target, and repeat the read-only identity check.
- Saved text differs from the preview: verify the page and element IDs, then check preview/cache behavior before issuing another write.
From a draft to an agency handoff
Section titled “From a draft to an agency handoff”Use the AI Elementor agency workflow to turn a brief into acceptance checks, review desktop and mobile output, record a targeted revision, and prepare a handoff with unresolved work clearly identified.